环境准备
服务器:CentOS 7 64位
数据库:MySQL 5.7.40
安装位置:/home/hxstrive
下载 MySQL
下载地址:https://dev.mysql.com/downloads/mysql/5.7.html#downloadsmysql
安装包:mysql-5.7.40-linux-glibc2.12-x86_64.tar.gz
linux广告位
安装 MySQL
卸载 MySQL / MariaDB
检查是否已经安装 MySQL/MariaDB,命令如下:
# 查看是否已经安装 MySQL
rpm -qa | grep mysql
# 删除已经安装的 MySQL
rpm -e --nodeps mysql*
# 查看是否已经安装 MariaDB
rpm -qa | grep mariadb
# 删除已经安装的 MariaDB
rpm -e --nodeps mariadb*
上传安装包
使用 FTP 工具将安装包上传到 /home/hxstrive 目录,如果你使用的是 VMWare 虚拟机,是支持直接拷贝粘贴。
解压安装包
# 解压压缩包
[hxstrive@localhost ~]$ tar -xvzf mysql-5.7.40-linux-glibc2.12-x86_64.tar.gz
# 重名为 mysql5.7
[hxstrive@localhost ~]$ mv mysql-5.7.40-linux-glibc2.12-x86_64 mysql5.7
配置环境变量
# 编辑 /etc/profile 文件
[hxstrive@localhost etc]$ sudo vim /etc/profile
[sudo] password for hxstrive:
注意:在 /etc/profile 文件末尾添加如下内容
export MYSQL_HOME=/home/hxstrive/mysql5.7
export PATH=$MYSQL_HOME/bin:$PATH
执行 source 命令,使修改后的 /etc/profile 生效,如下:
[hxstrive@localhost etc]$ source /etc/profile
建立配置文件 my.cnf
# 将 mysql 安装包中的 support-files/my-default.cnf 配置模板复制到 /etc/my.cnf
[hxstrive@localhost ~]$ sudo cp /usr/local/mysql/support-files/my-default.cnf /etc/my.cnf
注意:如果没有 support-files/my-default.cnf 文件,则可以自己创建 /etc/my.cnf 文件
# 编辑复制后/自己创建的 my.cnf 文件
[hxstrive@localhost etc]$ vim /etc/my.cnf
文件内容如下:
[mysql]
socket=/home/hxstrive/mysql5.7/mysql.sock
default-character-set=utf8mb4

[mysqld]
basedir=/home/hxstrive/mysql5.7
datadir=/home/hxstrive/mysql5.7/data
# port=3306
# server_id=2
socket=/home/hxstrive/mysql5.7/mysql.sock

default_storage_engine=innodb
character-set-server=utf8mb4
collation-server=utf8mb4_bin
lower_case_table_names=1

sql_mode=NO_ENGINE_SUBSTITUTION,STRICT_TRANS_TABLES

[mysqld_safe]
log-error=/home/hxstrive/mysql5.7/data/mysqld.log
pid-file=/home/hxstrive/mysql5.7/mysqld.pid
开机启动项
将 MySQL 安装目录中 support-files 目录中的 mysql.server 文件拷贝到 /etc/init.d 目录中,如下:
[hxstrive@localhost ~]$ cp /home/hxstrive/mysql5.7/support-files/mysql.server /etc/init.d/mysqld
注意:Linux 中的 /etc/init.d 目录中存放的是一系列系统服务的管理脚本,如:启动、停止。我们用 service 命令可执行 init.d 目录中相应服务的脚本。
然后使用 vim /etc/init.d/mysqld 命令,编辑 mysqld 文件,修改 basedir 和 datadir 配置,指定基础和数据目录。配置如下:
basedir=/home/hxstrive/mysql5.7
datadir=/home/hxstrive/mysql5.7/data
授权(建立用户组和用户)
由于笔者这里是直接使用 hxstrive 用户启动 mysql,因此需要将 my.cnf 以及 mysqld 的拥有者修改为 hxstrive。命令如下:
[hxstrive@localhost ~]$ chown -R hxstrive:hxstrive /home/hxstrive/mysql5.7
[hxstrive@localhost ~]$ chown -R hxstrive:hxstrive /etc/my.cnf
[hxstrive@localhost ~]$ chown -R hxstrive:hxstrive /etc/init.d/mysqld
当然,你也可以自己创建 mysql 用户组和 mysql 用户,命令如下:
# 创建用户组
[hxstrive@localhost ~]$ groupadd mysql
# 创建用户
[hxstrive@localhost ~]$ useradd -r -g mysql mysql
# 修改 mysql 相关文件的拥有者为 mysql
[hxstrive@localhost ~]$ chown -R mysql:mysql /home/hxstrive/mysql5.7
[hxstrive@localhost ~]$ chown -R mysql:mysql /etc/my.cnf
[hxstrive@localhost ~]$ chown -R mysql:mysql /etc/init.d/mysqld
初始化MySQL服务器
执行 mysqld --initialize 命令初始化 MySQL,初始化后 MySQL 会在 data 目录下面写入初始化数据,以及输出临时密码。命令如下:
[hxstrive@localhost data]$ /home/hxstrive/mysql5.7/bin/mysqld --initialize
2023-05-08T02:25:05.175459Z 0 [Warning] Changed limits: max_open_files: 1024 (requested 5000)
2023-05-08T02:25:05.175567Z 0 [Warning] Changed limits: table_open_cache: 431 (requested 2000)
2023-05-08T02:25:05.175747Z 0 [Warning] TIMESTAMP with implicit DEFAULT value is deprecated. Please use --explicit_defaults_for_timestamp server option (see documentation for more details).
2023-05-08T02:25:05.175757Z 0 [Warning] 'NO_ZERO_DATE', 'NO_ZERO_IN_DATE' and 'ERROR_FOR_DIVISION_BY_ZERO' sql modes should be used with strict mode. They will be merged with strict mode in a future release.
2023-05-08T02:25:05.175759Z 0 [Warning] 'NO_AUTO_CREATE_USER' sql mode was not set.
2023-05-08T02:25:05.554889Z 0 [Warning] InnoDB: New log files created, LSN=45790
2023-05-08T02:25:05.647571Z 0 [Warning] InnoDB: Creating foreign key constraint system tables.
2023-05-08T02:25:05.713029Z 0 [Warning] No existing UUID has been found, so we assume that this is the first time that this server has been started. Generating a new UUID: 8b7e626a-ed47-11ed-8c6a-000c298e419b.
2023-05-08T02:25:05.713894Z 0 [Warning] Gtid table is not ready to be used. Table 'mysql.gtid_executed' cannot be opened.
2023-05-08T02:25:06.407216Z 0 [Warning] A deprecated TLS version TLSv1 is enabled. Please use TLSv1.2 or higher.
2023-05-08T02:25:06.407254Z 0 [Warning] A deprecated TLS version TLSv1.1 is enabled. Please use TLSv1.2 or higher.
2023-05-08T02:25:06.409477Z 0 [Warning] CA certificate ca.pem is self signed.
2023-05-08T02:25:06.547281Z 1 [Note] A temporary password is generated for root@localhost: Gi29(jkPwpo?
注意:上面最后一行为的 Gi29(jkPwpo? 为 MySQL 的初始化密码。
spring广告位
MySQL服务管理
# 启动服务
[hxstrive@localhost data]$ service mysqld start
Starting MySQL. SUCCESS!

# 中止服务
[hxstrive@localhost data]$ service mysqld stop
Shutting down MySQL.. SUCCESS!

# 重启服务
[hxstrive@localhost data]$ service mysqld restart
Shutting down MySQL.. SUCCESS!
Starting MySQL. SUCCESS!

# 查看启动状态
[hxstrive@localhost data]$ service mysqld status
 SUCCESS! MySQL running (5573)
登陆 MySQL
在登录 MySQL 之前,记得启动 MySQL。命令如下:
[hxstrive@localhost data]$ mysql -u root -p
Enter password: 输入临时密码 Gi29(jkPwpo?
Welcome to the MySQL monitor.  Commands end with ; or \g.
Your MySQL connection id is 2
Server version: 5.7.40

Copyright (c) 2000, 2022, Oracle and/or its affiliates.

Oracle is a registered trademark of Oracle Corporation and/or its
affiliates. Other names may be trademarks of their respective
owners.

Type 'help;' or '\h' for help. Type '\c' to clear the current input statement.

mysql>
修改临时密码
# 修改 root 的密码
mysql> set password=password('aaaaaa');
Query OK, 0 rows affected, 1 warning (0.00 sec)

# 刷新权限
mysql> flush privileges;
Query OK, 0 rows affected (0.01 sec)
设置远程访问
# 授权
mysql> grant all privileges on *.* to 'root'@'%' identified by '123456789' with grant option;
Query OK, 0 rows affected, 1 warning (0.00 sec)

# 刷新权限
mysql> flush privileges;
Query OK, 0 rows affected (0.00 sec)
开启 3306 端口
# 添加 3306 端口到防火墙
[hxstrive@localhost ~]$ firewall-cmd --zone=public --add-port=3306/tcp --permanent
success

# 停止防火墙服务
[hxstrive@localhost ~]$ sudo systemctl stop firewalld.service
[sudo] password for hxstrive:

# 启动防火墙服务
[hxstrive@localhost ~]$ sudo systemctl start firewalld.service
设置开机启动
# 设置 mysqld 服务开机启动
[hxstrive@localhost ~]$ sudo chkconfig mysqld on

# 查看 mysqld 服务开机启动状态
[hxstrive@localhost ~]$ sudo chkconfig --list mysqld

Note: This output shows SysV services only and does not include native
      systemd services. SysV configuration data might be overridden by native
      systemd configuration.

      If you want to list systemd services use 'systemctl list-unit-files'.
      To see services enabled on particular target use
      'systemctl list-dependencies [target]'.

mysqld         	0:off	1:off	2:on	3:on	4:on	5:on	6:off
创建非 root 用户
# 创建 test 用户
mysql> create user 'test'@'%' identified by 'aaaaaa';
Query OK, 0 rows affected (0.00 sec)

# 为 test 用户授权
mysql> grant all privileges on *.* to 'test'@'%' identified by 'aaaaaa' with grant option;
Query OK, 0 rows affected, 1 warning (0.00 sec)

# 刷新权限
mysql> flush privileges;
Query OK, 0 rows affected (0.00 sec)
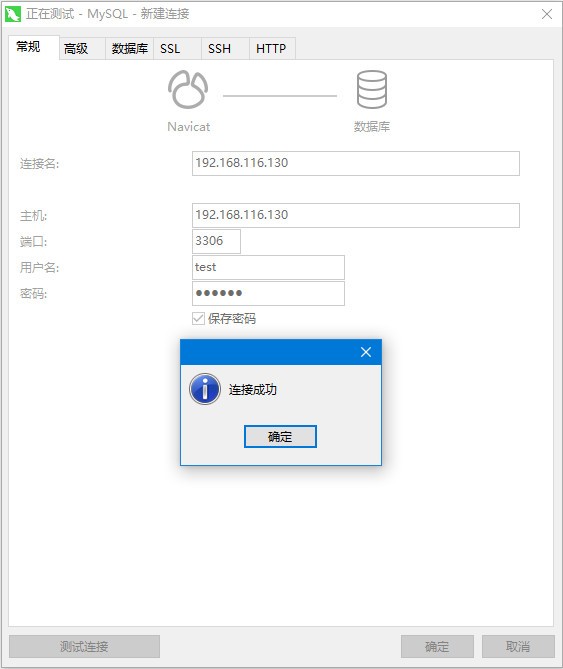
测试连接
使用 Navicat 连接到 MySQL,如下图:


 川公网安备51010802032098