Spring Boot中集成MyBatis可以大致分为如下几个步骤:
(1)引用依赖,其中包含:mybatis-spring-boot-starter、mysql jdbc驱动。
(2)配置数据源
(3)指定mybatis的mapper和entity
下面将通过实例来演示注释版MyBatis 和 配置文件版本MyBatis集成。
准备工作
在正式开始之前,我们将先创建一个test的mysql数据库,创建一张user表。SQL如下:
CREATE TABLE `user` (
  `id` int(10) unsigned NOT NULL AUTO_INCREMENT,
  `name` varchar(255) DEFAULT NULL,
  `age` int(11) DEFAULT NULL,
  `sex` varchar(10) DEFAULT NULL,
  PRIMARY KEY (`id`)
) ENGINE=InnoDB AUTO_INCREMENT=3 DEFAULT CHARSET=utf8;
集成注解版MyBatis
(1)引入集成mybatis需要的依赖,如下:
<dependency>
	<groupId>org.springframework.boot</groupId>
	<artifactId>spring-boot-starter-web</artifactId>
</dependency>
<dependency>
	<groupId>org.mybatis.spring.boot</groupId>
	<artifactId>mybatis-spring-boot-starter</artifactId>
	<version>2.0.0</version>
</dependency>
<dependency>
	<groupId>com.mysql</groupId>
	<artifactId>mysql-connector-java</artifactId>
	<version>5.1.27</version>
</dependency>
<dependency>
	<groupId>org.springframework.boot</groupId>
	<artifactId>spring-boot-devtools</artifactId>
	<scope>runtime</scope>
</dependency>
<dependency>
	<groupId>org.springframework.boot</groupId>
	<artifactId>spring-boot-starter-test</artifactId>
	<scope>test</scope>
</dependency>
mybatis-spring-boot-starter 是我们最需要关注的,Spring Boot集成MyBatis的核心依赖。mysql-connector-java 为MySQL的JDBC驱动。
(2)配置数据源
修改 application.properties 文件,添加如下内容:
spring.datasource.driverClassName=com.mysql.jdbc.Driver
spring.datasource.url=jdbc:mysql://localhost:3306/test?useUnicode=true&characterEncoding=utf-8
spring.datasource.username=root
spring.datasource.password=aaaaaa
(3)指定mybatis的mapper和entity
在 Spring Boot 的启动类中,添加@MapperScan注解,指定mapper文件所在的包。如下:
@SpringBootApplication
@MapperScan("com.huangx.mapper")
public class SpringbootMybatisApplication {

    public static void main(String[] args) {
        SpringApplication.run(SpringbootMybatisApplication.class, args);
    }

}
如果mapper存在多个包下面,这样配置:
@MapperScan({"com.huangx.mapper", "com.huangxin.mapper2"})然后,再次修改 application.properties 文件,添加 mybatis.type-aliases-package 属性,指定mybatis entity所在的包。如下:
# mybatis entity
mybatis.type-aliases-package=com.huangx.entity
如果实体也在几个包中,包名用逗号分隔。如下:
# 配置多个实体包
mybatis.type-aliases-package=com.huangx.entity,com.huangx.entity2
到这里,集成MyBatis的工作就完成了,下面编写Mapper实例,来验证。
(4)编写Mapper
package com.huangx.mapper;
import com.huangx.entity.UserEntity;
import org.apache.ibatis.annotations.Result;
import org.apache.ibatis.annotations.Results;
import org.apache.ibatis.annotations.Select;
import java.util.List;

public interface UserMapper {

    @Select("select id, name, age, sex from user")
    @Results({
            @Result(property = "id", column = "id", javaType = Long.class),
            @Result(property = "name", column = "name", javaType = String.class),
            @Result(property = "sex", column = "sex", javaType = String.class),
            @Result(property = "age", column = "age", javaType = Integer.class)
    })
    List<UserEntity> findAll();

}
(5)测试
package com.huangx;

import com.alibaba.fastjson.JSONObject;
import com.huangx.entity.UserEntity;
import com.huangx.mapper.UserMapper;
import org.junit.Test;
import org.junit.runner.RunWith;
import org.springframework.beans.factory.annotation.Autowired;
import org.springframework.boot.test.context.SpringBootTest;
import org.springframework.test.context.junit4.SpringRunner;

import java.util.List;

@RunWith(SpringRunner.class)
@SpringBootTest
public class SpringbootMybatisApplicationTests {

    @Autowired
    private UserMapper userMapper;


    @Test
    public void findAll() {
        List<UserEntity> userEntities = userMapper.findAll();
        System.out.println(JSONObject.toJSONString(userEntities, true));
    }

}
springboot广告位
集成配置文件版MyBatis
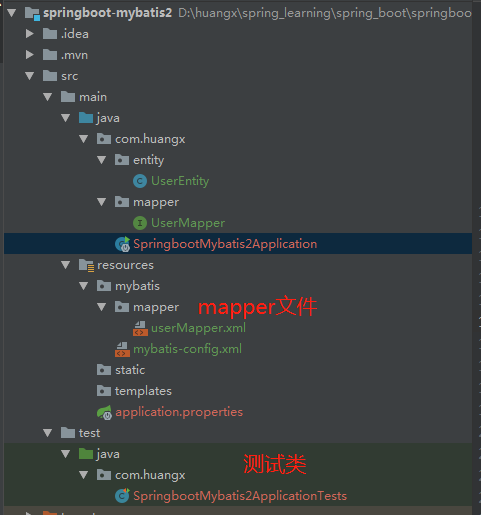
先看一下项目的结构图,如下图:
配置文件版本的MyBatis和注解版的依赖是一样的,参考上面即可。
(1)修改application.properties文件,配置数据源和指定mybatis配置文件、mapper文件的位置。如下:
# datasource
spring.datasource.driverClassName=com.mysql.jdbc.Driver
spring.datasource.url=jdbc:mysql://localhost:3306/test?useUnicode=true&characterEncoding=utf-8
spring.datasource.username=root
spring.datasource.password=aaaaaa

# 指定mybatis配置文件的位置
mybatis.config-locations=classpath:mybatis/mybatis-config.xml
# 指定mybatis的mapper文件的位置
mybatis.mapper-locations=classpath:mybatis/mapper/*.xml
(2)编写mybatis-config.xml文件
<?xml version="1.0" encoding="UTF-8" ?>
<!DOCTYPE configuration PUBLIC "-//mybatis.org//DTD Config 3.0//EN"
        "https://mybatis.org/dtd/mybatis-3-config.dtd">
<configuration>
    <typeAliases>
        <typeAlias alias="Integer" type="java.lang.Integer" />
        <typeAlias alias="Long" type="java.lang.Long" />
        <typeAlias alias="HashMap" type="java.util.HashMap" />
        <typeAlias alias="LinkedHashMap" type="java.util.LinkedHashMap" />
        <typeAlias alias="ArrayList" type="java.util.ArrayList" />
        <typeAlias alias="LinkedList" type="java.util.LinkedList" />
    </typeAliases>
</configuration>
(3)编写userMapper.xml文件和Mapper接口
<!DOCTYPE mapper PUBLIC "-//mybatis.org//DTD Mapper 3.0//EN"
        "https://mybatis.org/dtd/mybatis-3-mapper.dtd">
<mapper namespace="com.huangx.mapper.UserMapper" >

    <resultMap id="userMap" type="com.huangx.entity.UserEntity" >
        <id column="id" property="id" jdbcType="INTEGER" />
        <result column="name" property="name" jdbcType="VARCHAR" />
        <result column="age" property="age" jdbcType="INTEGER" />
        <result column="sex" property="sex" jdbcType="VARCHAR"/>
    </resultMap>

    <select id="findAll" resultMap="userMap">
      SELECT id, name, age, sex from user
    </select>

</mapper>
UserMapper.java文件
package com.huangx.mapper;

import com.huangx.entity.UserEntity;
import java.util.List;

public interface UserMapper {
    List<UserEntity> findAll();
}
(4)编写主类 SpringbootMybatis2Application.java,此类也需要使用 @MapperScan 指定Mapper所在的包。如下:
package com.huangx;

import org.mybatis.spring.annotation.MapperScan;
import org.springframework.boot.SpringApplication;
import org.springframework.boot.autoconfigure.SpringBootApplication;

@SpringBootApplication
@MapperScan("com.huangx.mapper")
public class SpringbootMybatis2Application {

    public static void main(String[] args) {
        SpringApplication.run(SpringbootMybatis2Application.class, args);
    }

}
(5)测试类
package com.huangx;

import com.huangx.entity.UserEntity;
import com.huangx.mapper.UserMapper;
import org.junit.Test;
import org.junit.runner.RunWith;
import org.springframework.beans.factory.annotation.Autowired;
import org.springframework.boot.test.context.SpringBootTest;
import org.springframework.test.context.junit4.SpringRunner;

import java.util.List;

@RunWith(SpringRunner.class)
@SpringBootTest
public class SpringbootMybatis2ApplicationTests {

    @Autowired
    UserMapper userMapper;

    @Test
    public void findAll() {
        List<UserEntity> userEntityList = userMapper.findAll();
        for(UserEntity userEntity : userEntityList) {
            System.out.println(userEntity);
        }
    }

}
在年轻人的颈项上,没有什么东西能比事业心这颗灿烂的宝珠更迷人的了。 —— 哈菲兹


 川公网安备51010802032098