本文将介绍maven中-D和-P参数,我们通过这两个参数可以在使用mvn命令运行maven时传递参数或者激活profiles配置文件。
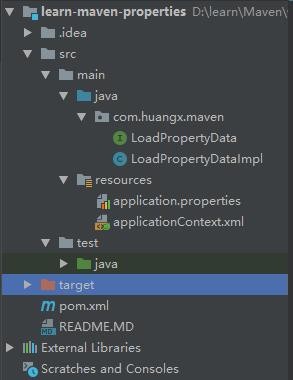
在正式介绍之前,我们假设我们存在这样一个简单的maven项目,项目结果如下图:
其中:
LoadPropertyData:一个简单的接口,该接口只有一个getData方法
LoadPropertyDataImpl:该接口使用 @Value 注解从 application.properties 文件获取属性,然后通过 getData方法输出到控制台。
application.properties:定义一些属性,有些属性直接应用 maven pom.xml文件中profile中定义的属性
applicationContext.xml:spring配置文件
LoadPropertyData.java
package com.huangx.maven;

public interface LoadPropertyData {
    void getData();
}
LoadPropertyDataImpl.java
package com.huangx.maven;

import org.springframework.beans.factory.annotation.Value;
import org.springframework.stereotype.Service;

@Service
public class LoadPropertyDataImpl implements LoadPropertyData {

    @Value("${app}")
    private String app;

    @Value("${version}")
    private String version;

    @Value("${apiUrl}")
    private String apiUrl;

    @Value("${username}")
    private String username;

    @Value("${password}")
    private String password;


    public void getData() {
        System.out.println("app = " + app);
        System.out.println("version = " + version);
        System.out.println("apiUrl = " + apiUrl);
        System.out.println("username = " + username);
        System.out.println("password = " + password);
    }
}
applicationContext.xml
<?xml version="1.0" encoding="UTF-8"?>
<beans xmlns="https://www.springframework.org/schema/beans"
       xmlns:xsi="https://www.w3.org/2001/XMLSchema-instance"
       xmlns:context="https://www.springframework.org/schema/context"
       xsi:schemaLocation="https://www.springframework.org/schema/beans
            https://www.springframework.org/schema/beans/spring-beans.xsd
            https://www.springframework.org/schema/context
            https://www.springframework.org/schema/context/spring-context.xsd">

    <context:component-scan base-package="com.huangx.maven" />
    <context:property-placeholder location="classpath:application.properties" />
</beans>
application.properties
app=learn-maven-properties
version=1.0.0

## 下面信息有maven profile动态设置
apiUrl=${maven-apiUrl}
username=${maven-username}
password=${maven-password}
pom.xml
<?xml version="1.0" encoding="UTF-8"?>
<project xmlns="https://maven.apache.org/POM/4.0.0"
         xmlns:xsi="https://www.w3.org/2001/XMLSchema-instance"
         xsi:schemaLocation="https://maven.apache.org/POM/4.0.0 https://maven.apache.org/xsd/maven-4.0.0.xsd">
    <modelVersion>4.0.0</modelVersion>
    <groupId>com.huangx.maven</groupId>
    <artifactId>learn-maven-properties</artifactId>
    <version>1.0-SNAPSHOT</version>

    <!-- 定义maven的版本属性 -->
    <properties>
        <spring.version>4.3.12.RELEASE</spring.version>
    </properties>

    <dependencies>
        <dependency>
            <groupId>org.springframework</groupId>
            <artifactId>spring-core</artifactId>
            <version>${spring.version}</version>
        </dependency>
        <dependency>
            <groupId>org.springframework</groupId>
            <artifactId>spring-aop</artifactId>
            <version>${spring.version}</version>
        </dependency>
        <dependency>
            <groupId>org.springframework</groupId>
            <artifactId>spring-context</artifactId>
            <version>${spring.version}</version>
        </dependency>
        <dependency>
            <groupId>org.springframework</groupId>
            <artifactId>spring-context-support</artifactId>
            <version>${spring.version}</version>
        </dependency>
        <dependency>
            <groupId>org.springframework</groupId>
            <artifactId>spring-test</artifactId>
            <version>${spring.version}</version>
        </dependency>
        <dependency>
            <groupId>junit</groupId>
            <artifactId>junit</artifactId>
            <version>4.12</version>
        </dependency>
    </dependencies>

    <build>
        <finalName>learn-maven-properties</finalName>

        <!-- 必须开启资源过滤 -->
        <!-- 只有我们开启资源过滤后,在 properties 文件中才能引用我们在 pom 文件中定义的属性 -->
        <resources>
            <resource>
                <directory>${project.basedir}/src/main/resources</directory>
                <filtering>true</filtering>
            </resource>
        </resources>
        <testResources>
            <testResource>
                <directory>${project.basedir}/src/test/resources</directory>
                <filtering>true</filtering>
            </testResource>
        </testResources>
    </build>

    <profiles>
        <profile>
            <id>default</id>
            <properties>
                <!-- 自定义属性 -->
                <maven-apiUrl>https://192.168.10.180:8080</maven-apiUrl>
                <maven-username>root</maven-username>
                <maven-password>aaaaaa</maven-password>
            </properties>
            <activation>
                <!-- 设置默认激活这个配置 -->
                <activeByDefault>true</activeByDefault>
            </activation>
        </profile>
        <profile>
            <id>release</id>
            <properties>
                <!-- 自定义属性 -->
                <maven-apiUrl>https://10.87.11.228:8080</maven-apiUrl>
                <maven-username>root</maven-username>
                <maven-password>relase_password</maven-password>
            </properties>
        </profile>
    </profiles>

</project>
上面的 pom.xml 文件定义了两个profile,分别为 default 和 release;每个profile中定义了三个属性,分别为“maven-apiUrl”、“maven-username”和“maven-password”属性,这些属性将在 application.properties 属性文件中通过“${}”方式使用。
maven广告位
mvn -D代表(Properties属性)
-D参数和执行 java 时指定的 -D 类似。使用命令行设置属性 -D 的正确方法是:
mvn -DpropertyName=propertyValue clean package
其中:
要发送多个变量,请使用多个空格分隔符加-D:
mvn -DpropA=valueA -DpropB=valueB -DpropC=valueC clean package
进入到项目所在的目录,然后打开DOS命令行,执行如下命令:
PS D:\learn\Maven\workspaces\learn-maven-properties> mvn -D maven-password=123456 clean package
[INFO] Scanning for projects...
[INFO]
[INFO] --------------< com.huangx.maven:learn-maven-properties >---------------
[INFO] Building learn-maven-properties 1.0-SNAPSHOT
[INFO] --------------------------------[ jar ]---------------------------------
[INFO]
[INFO] --- maven-clean-plugin:2.5:clean (default-clean) @ learn-maven-properties ---
[INFO] Deleting D:\learn\Maven\workspaces\learn-maven-properties\target
[INFO]
[INFO] --- maven-resources-plugin:2.6:resources (default-resources) @ learn-maven-properties ---
[WARNING] File encoding has not been set, using platform encoding GBK, i.e. build is platform dependent!
[WARNING] Using platform encoding (GBK actually) to copy filtered resources, i.e. build is platform dependent!
[INFO] Copying 2 resources
[INFO]
[INFO] --- maven-compiler-plugin:3.1:compile (default-compile) @ learn-maven-properties ---
[INFO] Changes detected - recompiling the module!
[WARNING] File encoding has not been set, using platform encoding GBK, i.e. build is platform dependent!
[INFO] Compiling 2 source files to D:\learn\Maven\workspaces\learn-maven-properties\target\classes
[INFO]
[INFO] --- maven-resources-plugin:2.6:testResources (default-testResources) @ learn-maven-properties ---
[WARNING] File encoding has not been set, using platform encoding GBK, i.e. build is platform dependent!
[WARNING] Using platform encoding (GBK actually) to copy filtered resources, i.e. build is platform dependent!
[INFO] skip non existing resourceDirectory D:\learn\Maven\workspaces\learn-maven-properties\src\test\resources
[INFO]
[INFO] --- maven-compiler-plugin:3.1:testCompile (default-testCompile) @ learn-maven-properties ---
[INFO] Changes detected - recompiling the module!
[WARNING] File encoding has not been set, using platform encoding GBK, i.e. build is platform dependent!
[INFO] Compiling 1 source file to D:\learn\Maven\workspaces\learn-maven-properties\target\test-classes
[INFO]
[INFO] --- maven-surefire-plugin:2.22.1:test (default-test) @ learn-maven-properties ---
[INFO] Tests are skipped.
[INFO]
[INFO] --- maven-jar-plugin:2.4:jar (default-jar) @ learn-maven-properties ---
[INFO] Building jar: D:\learn\Maven\workspaces\learn-maven-properties\target\learn-maven-properties.jar
[INFO] ------------------------------------------------------------------------
[INFO] BUILD SUCCESS
[INFO] ------------------------------------------------------------------------
[INFO] Total time: 3.697 s
[INFO] Finished at: 2019-08-07T08:21:14+08:00
[INFO] ------------------------------------------------------------------------
上面使用 -D 修改 maven-password 的值为 123456,查看最终编译好的 application.properties 文件。如下:
app=learn-maven-properties
version=1.0.0

## 下面信息有maven profile动态设置
apiUrl=https://192.168.10.180:8080
username=root
password=123456
-P代表(Profiles配置文件)
在上面的 pom.xml 文件中,<profiles>指定的<id>分别为“default”和“release”,可以通过-P进行传递“default”或“release”来激活某个 profile。运行如下命令:
mvn -Prelease clean package
该命令将会激活<id>等于release的profile。我们再次去查看application.properties文件(注意:是target/classes下面),内容如下:
app=learn-maven-properties
version=1.0.0

## 下面信息有maven profile动态设置
apiUrl=https://10.87.11.228:8080
username=root
password=relase_password
另外,我们也可以使用<activation>标签指定其他的激活条件。如下:
<profiles>
    <profile>
        <id>default</id>
        <activation>
            <property>
                <name>env</name>
                <value>dev</value>
            </property>
            <!-- 设置默认激活这个配置 -->
            <activeByDefault>true</activeByDefault>
        </activation>
        <properties>
            <!-- 自定义属性 -->
            <maven-apiUrl>https://192.168.10.180:8080</maven-apiUrl>
            <maven-username>root</maven-username>
            <maven-password>aaaaaa</maven-password>
        </properties>
    </profile>
    <profile>
        <id>release</id>
        <activation>
            <property>
                <name>env</name>
                <value>release</value>
            </property>
        </activation>
        <properties>
            <!-- 自定义属性 -->
            <maven-apiUrl>https://10.87.11.228:8080</maven-apiUrl>
            <maven-username>root</maven-username>
            <maven-password>relase_password</maven-password>
        </properties>
    </profile>
</profiles>
上面在每个profile中定义了一个激活条件,即 env 属性;当 env=dev 时,激活 id=default 的 profile;当env=release,激活 id=release 的 profile。
执行如下命令:
mvn -D env=release clean package
将激活属性 env=release 的 profile。
注意:
这里不要使用“mvn -P env=release clean package”,我们定义的 profile 触发条件为属性 env 等于 “dev”或“release”,使用 -P 将抛出提示信息:
[INFO] ------------------------------------------------------------------------
[INFO] BUILD SUCCESS
[INFO] ------------------------------------------------------------------------
[INFO] Total time: 3.556 s
[INFO] Finished at: 2019-08-07T08:55:30+08:00
[INFO] ------------------------------------------------------------------------
[WARNING] The requested profile "env=release" could not be activated because it does not exist.


 川公网安备51010802032098