本教程详细讲解如何使用Docker在Ubuntu和CentOS系统上安装Jupyter服务,包括Docker安装、Jupyter容器启动、端口映射、数据持久化、密码获取和访问方法,提供完整的一键部署命令和配置说明。
安装 Docker
如果你没有安装 Docker,请执行下面语句安装 Docker。
Ubuntu / Debian 复制这条:
curl -fsSL https://get.docker.com | bash
CentOS 复制这条:
curl -fsSL https://get.docker.com | bash
参考:https://www.hxstrive.com/subject/docker.htm
一条命令启动 Jupyter
使用 Docker 安装 Jupyter 非常简单,只需要一条命令即可,如下:
docker run -d \
  --name jupyter \
  --restart always \
  -p 8888:8888 \
  -v /root/jupyter:/home/jovyan/work \
  -e JUPYTER_ENABLE_LAB=yes \
  jupyter/datascience-notebook
那么,上面命令做了什么?
如果没有下载镜像,则自动下载官方镜像。
--restart always 表示后台永久运行,开机自启。
端口 8888
把文件存在本地 /root/jupyter 里(删除容器也不丢)
自带:Python、Pandas、Matplotlib、Bash、Git 等
执行上面命令,效果如下:
root@localhost:~# docker run -d \
  --name jupyter \
  -p 8888:8888 \
  -v /root/jupyter:/home/jovyan/work \
  -e JUPYTER_ENABLE_LAB=yes \
  jupyter/datascience-notebook
Unable to find image 'jupyter/datascience-notebook:latest' locally
latest: Pulling from jupyter/datascience-notebook
aece8493d397: Pulling fs layer
fd92c719666c: Pulling fs layer
088f11eb1e74: Pull complete
4f4fb700ef54: Pull complete
ef8373d600b0: Pull complete
77e45ee945dc: Pull complete
a30f89a0af6c: Pull complete
dc42adc7eb73: Pull complete
abaa8376a650: Pull complete
aa099bb9e49a: Pull complete
822c4cbcf6a6: Pull complete
d25166dcdc7b: Pull complete
964fc3e4ff9f: Pull complete
2c4c69587ee4: Pull complete
de2cdd875fa8: Pull complete
75d33599f5f2: Pull complete
31973ea82470: Pull complete
96ee7e4439c7: Pull complete
1f9ad23c07ac: Pull complete
d19266e0cb17: Pull complete
9a165b6e9dc7: Pull complete
5689442fd4e1: Pull complete
9a6a202f62a6: Pull complete
734ea0c3d94e: Pull complete
a21a167f7127: Pull complete
02c2173301db: Pull complete
e488194bf535: Pull complete
f5302bfd25be: Pull complete
5201d3116fb6: Pull complete
Digest: sha256:476c6e673e7d5d8b5059f8680b1c6a988942a79263da651bf302dc696ab311f2
Status: Downloaded newer image for jupyter/datascience-notebook:latest
2430ee1ddb0aa8539901a845652ad3c2ee4c2c81439305f03588b9be8d54d652
使用 docker ps 查看 Docker 容器状态,如下:
root@localhost:~# docker ps
CONTAINER ID   IMAGE                          COMMAND                  CREATED          STATUS                    PORTS                                                    NAMES
2430ee1ddb0a   jupyter/datascience-notebook   "tini -g -- start-no…"   12 minutes ago   Up 12 minutes (healthy)   0.0.0.0:8888->8888/tcp, [::]:8888->8888/tcp              jupyter
1569d69afd11   mysql:8.0                      "docker-entrypoint.s…"   8 months ago     Up 28 minutes             0.0.0.0:3306->3306/tcp, [::]:3306->3306/tcp, 33060/tcp   mysql
fe09ace436a8   f2cd22713a18                   "docker-entrypoint.s…"   8 months ago     Up 28 minutes             0.0.0.0:6379->6379/tcp, [::]:6379->6379/tcp              redis
获取登录密码 / Token
当容器启动成功后,使用如下命令查看容器日志信息
docker logs jupyter
此时,你会看到类似如下图的日志信息:
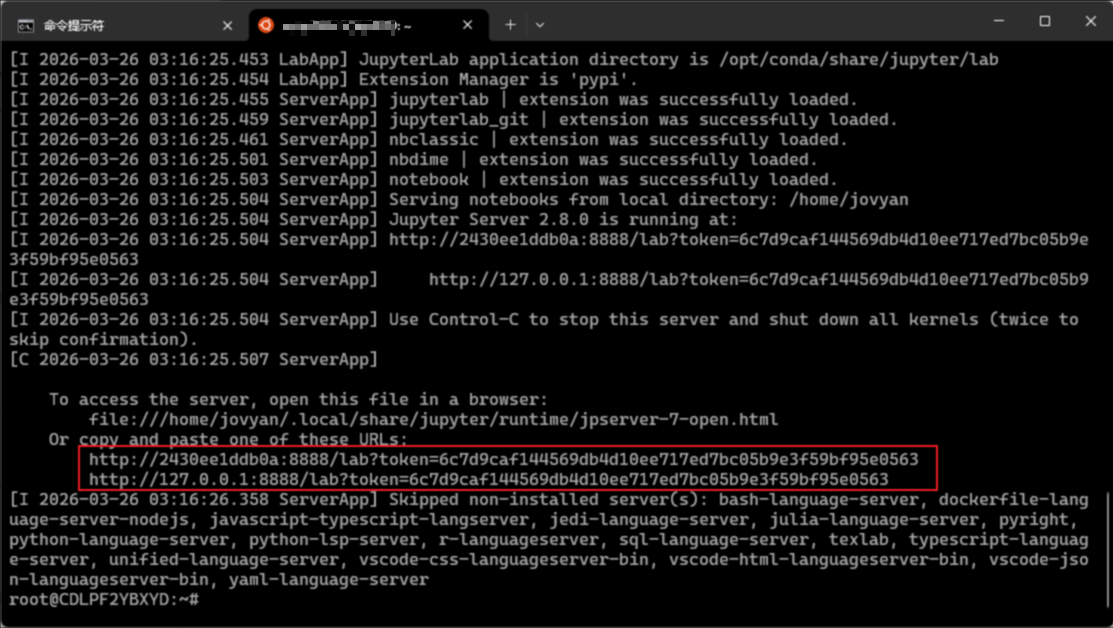
把 token= 后面的一长串复制下来,就是登录密码。
访问你的 Jupyter
浏览器打开:http://127.0.0.1:8888/lab?token=6c7d9caf144569db4d10ee717ed7bc05b9e3f59bf95e0563
效果如下图:

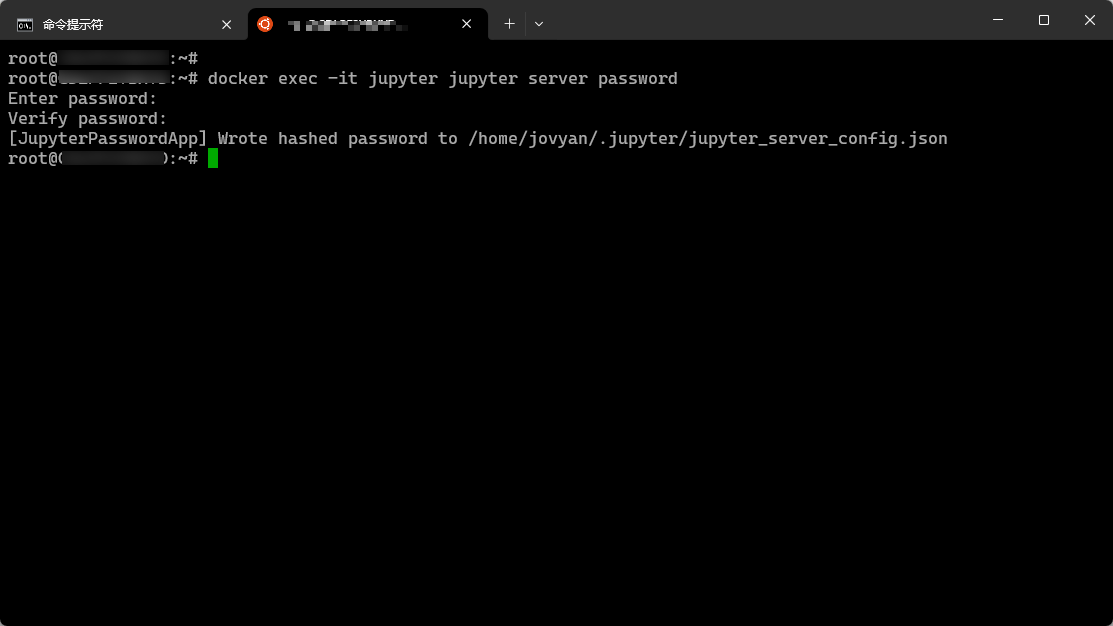
设置固定密码(推荐)
不可能每次登录 Jupyter 都要使用 Token,我们可以通过如下命令为 Docker 容器设置一个固定的密码,下次登录直接使用密码登录。
docker exec -it jupyter jupyter server password
输入你想设置的密码,以后就不用复制 token 了。
如果在胜利前却步,往往只会拥抱失败;如果在困难时坚持,常常会获得新的成功。


 川公网安备51010802032098