本博文将通过一个实例来展示怎样快速搭建Eureka Server注册中心。
在 Eureka简介 中,谈到Eureka包含两部分,分别是:Eureka Server 和 Eureka Client。下面将介绍怎样去搭建一个Eureka服务器;
注意:我们采用的Spring Boot版本是 1.5.2.RELEASE,同时要保证 Eureka的版本一致。
<parent>
    <groupId>org.springframework.boot</groupId>
    <artifactId>spring-boot-starter-parent</artifactId>
    <version>1.5.2.RELEASE</version>
    <relativePath/>
</parent>
创建普通Spring Boot项目
Spring Boot可以通过Spring Initializr (https://start.spring.io/ ) 进行快速创建,如下图:
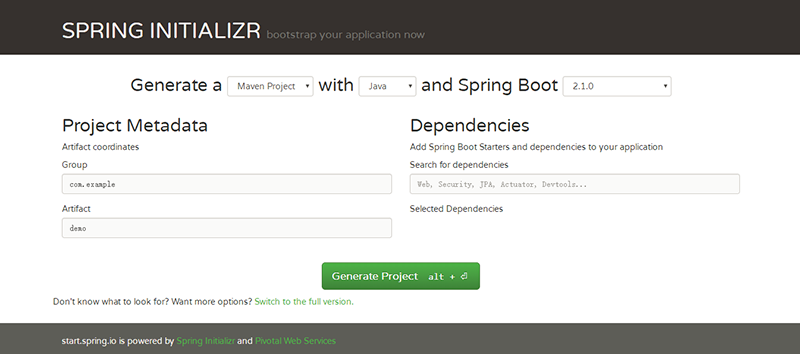
上图中,简单的选择Maven版本、Spring Boot、Group和Artifact等信息,即可创建一个Spring Boot项目。然后下载到本地,通过IDEA、Eclipse进行导入。当然,也可以直接通过IDEA提供的Spring Initializr界面进行创建。
springcloud广告位
修改pom.xml文件
添加 spring-cloud-starter-eureka-server 依赖。完整的 pom 文件如下:
<?xml version="1.0" encoding="UTF-8"?>
<project xmlns="https://maven.apache.org/POM/4.0.0"
         xmlns:xsi="https://www.w3.org/2001/XMLSchema-instance"
         xsi:schemaLocation="https://maven.apache.org/POM/4.0.0 https://maven.apache.org/xsd/maven-4.0.0.xsd">
    <modelVersion>4.0.0</modelVersion>
    <groupId>com.forezp</groupId>
    <artifactId>eureka-server</artifactId>
    <version>0.0.1-SNAPSHOT</version>
    <packaging>jar</packaging>
    <parent>
        <groupId>org.springframework.boot</groupId>
        <artifactId>spring-boot-starter-parent</artifactId>
        <version>1.5.2.RELEASE</version>
        <relativePath/>
    </parent>

    <properties>
        <project.build.sourceEncoding>UTF-8</project.build.sourceEncoding>
        <project.reporting.outputEncoding>UTF-8</project.reporting.outputEncoding>
        <java.version>1.8</java.version>
    </properties>

    <dependencies>
        <!-- eureka server的依赖 -->
        <dependency>
            <groupId>org.springframework.cloud</groupId>
            <artifactId>spring-cloud-starter-eureka-server</artifactId>
        </dependency>
        <dependency>
            <groupId>org.springframework.boot</groupId>
            <artifactId>spring-boot-starter-test</artifactId>
            <scope>test</scope>
        </dependency>
    </dependencies>

    <dependencyManagement>
        <dependencies>
            <dependency>
                <groupId>org.springframework.cloud</groupId>
                <artifactId>spring-cloud-dependencies</artifactId>
                <version>Dalston.RC1</version>
                <type>pom</type>
                <scope>import</scope>
            </dependency>
        </dependencies>
    </dependencyManagement>

    <build>
        <plugins>
            <plugin>
                <groupId>org.springframework.boot</groupId>
                <artifactId>spring-boot-maven-plugin</artifactId>
            </plugin>
        </plugins>
    </build>
</project>
修改application.yml文件
server:
  port: 8761  # Eureka Server的端口
eureka:
  instance:
    hostname: localhost  # Eureka Server的主机地址
  client:
    registerWithEureka: false  # 自己不注册到 Eureka Server
    fetchRegistry: false
    serviceUrl:
      # 注册中心访问地址
      defaultZone: https://${eureka.instance.hostname}:${server.port}/eureka/
修改EurekaServerApplication.java类
@EnableEurekaServer 该注解表明应用为eureka服务,有可以联合多个服务作为集群,对外提供服务注册以及发现功能
@SpringBootApplication(创建完的boot项目自带的启动注解,会加载一些配置)
package com.huangx.spring;
import org.springframework.boot.SpringApplication;
import org.springframework.boot.autoconfigure.SpringBootApplication;
import org.springframework.cloud.netflix.eureka.server.EnableEurekaServer;

@EnableEurekaServer
@SpringBootApplication
public class EurekaServerApplication {
    public static void main(String[] args) {
        SpringApplication.run(EurekaServerApplication.class, args);
    }
}
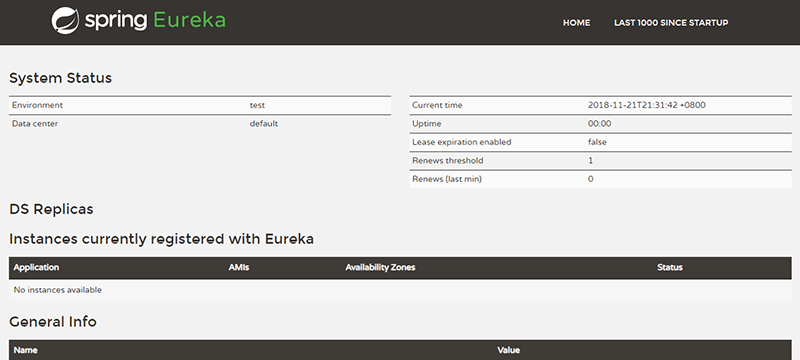
运行 EurekaServerApplication 类,然后通过浏览器访问 https://localhost:8761 ,如果能够看见下图页面则说明成功。


 川公网安备51010802032098