前面章节介绍了 Netflix Ribbon 的简单实例,本章节将根据上章节的实例来分析 Netflix Ribbon 执行流程。先看看 Demo 的 Java 代码:
package com.hxstrive.springcloud.ribbon_demo1;

import com.netflix.client.ClientFactory;
import com.netflix.client.http.HttpRequest;
import com.netflix.client.http.HttpResponse;
import com.netflix.config.ConfigurationManager;
import com.netflix.niws.client.http.RestClient;

public class Demo1 {

    public static void main(String[] args) throws Exception{
        // 1.加载配置信息
        ConfigurationManager.loadPropertiesFromResources("application.properties");
        System.out.println(ConfigurationManager.getConfigInstance().getProperty("user.ribbon.listOfServers"));

        // 2.返回名称为 user 的 RestClient 客户端
        // 注意:这里的名称是在 application.properties 文件中配置 ribbon 时的前缀
        //       user.ribbon.listOfServers=localhost:7001,localhost:7002,localhost:7003
        //       上面配置中的 user 就是客户端名称
        RestClient client = (RestClient) ClientFactory.getNamedClient("user");

        // 3.构建指定 URL 的 HTTP 请求
        HttpRequest request = HttpRequest.newBuilder().uri("/info").build();
        for (int i = 0; i < 10; i++)  {
            // 4.使用负载均衡算法发起 HTTP 请求
            HttpResponse response = client.executeWithLoadBalancer(request);
            // 打印调用状态和结果
            System.out.println("Status code for " + response.getRequestedURI() + "  status:"
                    + response.getStatus() + " entity: " + response.getEntity(String.class));
        }
    }

}
加载配置信息
ConfigurationManager 主要用来做配置管理,loadPropertiesFromResources() 方法用于加载配置文件,并把配置信息写入 ConcurrentMapConfiguration,为后续的请求做准备。源码如下:
/**
 * Load properties from resource file(s) into the system wide configuration
 * @param path relative path of the resources
 * @throws IOException
 */
public static void loadPropertiesFromResources(String path)
        throws IOException {
    if (instance == null) {
        instance = getConfigInstance();
    }
    ClassLoader loader = Thread.currentThread().getContextClassLoader();
    Enumeration<URL> resources = loader.getResources(path);
    if (!resources.hasMoreElements()) {
        //non-existent config path. Throw an exception. Issue #150
        throw new IOException("Cannot locate " + path + " as a classpath resource.");
    }
    while (resources.hasMoreElements()) {
        URL url = resources.nextElement();
        InputStream fin = url.openStream();
        Properties props = ConfigurationUtils.loadPropertiesFromInputStream(fin);
        // instance 类型为 ConcurrentCompositeConfiguration
        if (instance instanceof AggregatedConfiguration) {
            // 这里被执行
            String name = getConfigName(url);
            // 解析配置
            ConcurrentMapConfiguration config = new ConcurrentMapConfiguration();
            config.loadProperties(props);
            // 将配置添加到配置列表中
            ((AggregatedConfiguration) instance).addConfiguration(config, name);
        } else {
            ConfigurationUtils.loadProperties(props, instance);
        }
    }
}
因为 instance 类型为 ConcurrentCompositeConfiguration,而 ConcurrentCompositeConfiguration 类又实现了 AggregatedConfiguration 接口,因此将执行 if(){} 语句,因为在 properties 中设置 user.ribbon.listOfServers=localhost:7001, localhost:7002, localhost:7003,那么会把 key=user.ribbon.listOfServers,value=localhost:7001, localhost:7002, localhost:7003 的配置项添加到ConcurrentMapConfiguration 的 map,其他配置项类似。
springcloud广告位
ConcurrentCompositeConfiguration.addConfiguration() 方法代码如下:
public class ConcurrentCompositeConfiguration extends ConcurrentMapConfiguration
        implements AggregatedConfiguration, ConfigurationListener, Cloneable {
    //...
    public void addConfiguration(AbstractConfiguration config, String name) {
        if (containerConfigurationChanged) {
            // 执行这里
            addConfigurationAtIndex(config, name, configList.size());
        } else {
            addConfigurationAtIndex(config, name, configList.indexOf(containerConfiguration));
        }
    }

    /**
     * Add a configuration with a name at a particular index.
     *
     * @throws IndexOutOfBoundsException
     */
    public void addConfigurationAtIndex(AbstractConfiguration config, String name, int index)
    throws IndexOutOfBoundsException {
        if (!configList.contains(config)) {
            checkIndex(index);
            // 将配置信息添加到配置列表
            // private List<AbstractConfiguration> configList = new CopyOnWriteArrayList<AbstractConfiguration>();
            // 见调试图
            configList.add(index, config);
            if (name != null) {
                namedConfigurations.put(name, config);
            }
            config.addConfigurationListener(eventPropagater);
            fireEvent(EVENT_CONFIGURATION_SOURCE_CHANGED, null, null, false);
        } else {
            logger.warn(config + " is not added as it already exits");
        }
    }
    //...
}
configList 变量用来存放所有的配置信息,如下图:
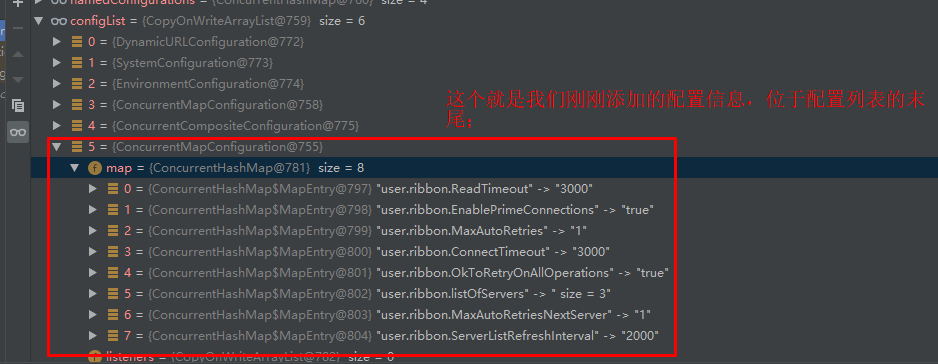
上图中,configList 变量包含了 6 种配置信息,分别是:
(1)DynamicURLConfiguration:默认配置
(2)SystemConfiguration:Java环境变量,例如:awt.toolkit、file.separator、java.version、java.ext.dirs 等等
(3)EnvironmentConfiguration:系统环境变量,例如:JAVA_HOM、PATH、OS、HOMEPATH 等等
(4)ConcurrentMapConfiguration:应用程序配置
(5)ConcurrentCompositeConfiguration:
(6)ConcurrentMapConfiguration:这个就是我们自己的配置信息,即 application.properties
获取 RestClient
上面实例中,使用如下语句获取 RestClient:
RestClient client = (RestClient) ClientFactory.getNamedClient("user");
上面代码通过 client name(这里是 user)来获取 RestClient 对象。源码如下:
/**
 * Return the named client from map if already created. Otherwise creates the client using the configuration returned by {@link #getNamedConfig(String)}.
 * 从map返回已命名的客户端(如果已创建)。否则,使用 getNamedConfig(String) 返回的配置创建客户端。
 * @throws RuntimeException if an error occurs in creating the client.
 */
public static synchronized IClient getNamedClient(String name) {
    return getNamedClient(name, DefaultClientConfigImpl.class);
}

/**
 * Return the named client from map if already created. Otherwise creates the client using the configuration returned by {@link #createNamedClient(String, Class)}.
 *  从 map 返回已命名的客户端(如果已创建)。否则,使用 createNamedClient(String,Class) 返回的配置创建客户端。
 * @throws RuntimeException if an error occurs in creating the client.
 */
public static synchronized IClient getNamedClient(String name, Class<? extends IClientConfig> configClass) {
   if (simpleClientMap.get(name) != null) {
       return simpleClientMap.get(name);
   }
    try {
        return createNamedClient(name, configClass);
    } catch (ClientException e) {
        throw new RuntimeException("Unable to create client", e);
    }
}

/**
 * Creates a named client using a IClientConfig instance created off the configClass class object passed in as the parameter.
 *  使用参数 configClass 类对象创建的 IClientConfig 实例创建命名客户端。
 * @throws ClientException if any error occurs, or if the client with the same name already exists
 */
public static synchronized IClient createNamedClient(String name, Class<? extends IClientConfig> configClass) throws ClientException {
   IClientConfig config = getNamedConfig(name, configClass);
    return registerClientFromProperties(name, config);
}
上面代码中,使用 getNamedConfig(name, configClass) 方法去创建 IClientConfig 对象,代码如下:
/**
 * Get the client configuration given the name or create one with clientConfigClass if it does not exist. An instance of IClientConfig
 * is created and {@link IClientConfig#loadProperties(String)} will be called.
 */
public static IClientConfig getNamedConfig(String name, Class<? extends IClientConfig> clientConfigClass) {
    // 根据指定的名称获取 IClientConfig,明显我们指定的客户端还没有被创建
    IClientConfig config = namedConfig.get(name);
    if (config != null) {
        return config;
    } else {
        try {
            // 通过反射的方式创建 IClientConfig 配置对象
            config = (IClientConfig) clientConfigClass.newInstance();
            // 加载 name(当前为 user)为前缀的配置,然后替换默认配置
            // 注意:在 loadProperties() 方法中,会先调用 loadDefaultValues() 方法去加载默认配置
            config.loadProperties(name);
        } catch (InstantiationException | IllegalAccessException e) {
            logger.error("Unable to create named client config '{}' instance for config class {}", name,
                    clientConfigClass, e);
            return null;
        }
        config.loadProperties(name);
        IClientConfig old = namedConfig.putIfAbsent(name, config);
        if (old != null) {
            config = old;
        }
        return config;
    }
}
最后,通过调用 ClientFactory 类的 registerClientFromProperties() 方法创建 IClient,代码如下:
/**
 * Utility method to create client and load balancer (if enabled in client config) given the name and client config.
 * Instances are created using reflection (see {@link #instantiateInstanceWithClientConfig(String, IClientConfig)}
 *
 * @param restClientName
 * @param clientConfig
 * @throws ClientException if any errors occurs in the process, or if the client with the same name already exists
 */
public static synchronized IClient<?, ?> registerClientFromProperties(String restClientName, IClientConfig clientConfig) throws ClientException {
   IClient<?, ?> client = null;
   ILoadBalancer loadBalancer = null;
   if (simpleClientMap.get(restClientName) != null) {
      throw new ClientException(
            ClientException.ErrorType.GENERAL,
            "A Rest Client with this name is already registered. Please use a different name");
   }
   try {
      String clientClassName = (String) clientConfig.getProperty(CommonClientConfigKey.ClientClassName);
      client = (IClient<?, ?>) instantiateInstanceWithClientConfig(clientClassName, clientConfig);
      boolean initializeNFLoadBalancer = Boolean.parseBoolean(clientConfig.getProperty(
            CommonClientConfigKey.InitializeNFLoadBalancer, DefaultClientConfigImpl.DEFAULT_ENABLE_LOADBALANCER).toString());
      if (initializeNFLoadBalancer) {
         loadBalancer  = registerNamedLoadBalancerFromclientConfig(restClientName, clientConfig);
      }
      if (client instanceof AbstractLoadBalancerAwareClient) {
         ((AbstractLoadBalancerAwareClient) client).setLoadBalancer(loadBalancer);
      }
   } catch (Throwable e) {
      String message = "Unable to InitializeAndAssociateNFLoadBalancer set for RestClient:"
            + restClientName;
      logger.warn(message, e);
      throw new ClientException(ClientException.ErrorType.CONFIGURATION,
            message, e);
   }
   simpleClientMap.put(restClientName, client);

   Monitors.registerObject("Client_" + restClientName, client);

   logger.info("Client Registered:" + client.toString());
   return client;
}
构建 HTTP 请求
在实例中,使用如下代码创建一个 HTTP 请求,代码如下:
HttpRequest request = HttpRequest.newBuilder().uri("/info").build();
该 HTTP 请求的地址为 “/info”。HttpRequest 是 ribbon-httpclient 提供的 HTTP 通信工具,它将作为 RestClient 发起 HTTP 请求的参数。
发起 HTTP 请求
在实例中,使用如下代码发起一个 HTTP 请求,代码如下:
HttpResponse response = client.executeWithLoadBalancer(request);
当调用者希望将请求分派给负载均衡器选择的服务器时,应使用 executeWithLoadBalancer() 方法,而不是在请求的 URI 中指定服务器。它通过调用 reconstructURIWithServer(com.netflix.loadbalancer.Server, java.net.URI),然后调用executeWithLoadBalancer(ClientRequest, com.netflix.client.config.IClientConfig) 来计算最终的 URI。
源码如下:
/**
 * This method should be used when the caller wants to dispatch the request to a server chosen by
 * the load balancer, instead of specifying the server in the request's URI.
 * It calculates the final URI by calling {@link #reconstructURIWithServer(com.netflix.loadbalancer.Server, java.net.URI)}
 * and then calls {@link #executeWithLoadBalancer(ClientRequest, com.netflix.client.config.IClientConfig)}.
 *
 * @param request request to be dispatched to a server chosen by the load balancer. The URI can be a partial
 * URI which does not contain the host name or the protocol.
 */
public T executeWithLoadBalancer(final S request, final IClientConfig requestConfig) throws ClientException {
    // 构建 LoadBalancerCommand
    LoadBalancerCommand<T> command = buildLoadBalancerCommand(request, requestConfig);

    try {
        // 创建一个 Observable 对象,一旦订阅了该 Observable,它将与负载均衡器选择的服务器异步执行网络调用。
        // 如果 RetryHandler 指示可重试任何错误,则该错误将由函数在内部使用,并且所订阅的 Observer 将不会观
        // 察到这些错误返回的 Observable。
        // 如果重试次数超过了允许的最大值,则返回的 Observable 将发出最终错误。
        // 否则,将发出执行和重试期间的第一个成功结果。
        return command.submit(
            // 为指定的服务提供 rx.Observable
            // 使用 com.netflix.loadbalancer.reactive.LoadBalancerCommand
            new ServerOperation<T>() {
                @Override
                public Observable<T> call(Server server) {
                    URI finalUri = reconstructURIWithServer(server, request.getUri());
                    S requestForServer = (S) request.replaceUri(finalUri);
                    try {
                        // 发起请求
                        // Observable.just() 方法来自 rxjava 框架,它将返回一个 Observable 对象
                        // rxjava 是一个异步框架,功能和 handler 类似,特点是链式调用,逻辑简单
                        // execute() 方法执行请求并返回响应。 不会重试,并且直接抛出所有异常。
                        return Observable.just(AbstractLoadBalancerAwareClient.this.execute(requestForServer, requestConfig));
                    }
                    catch (Exception e) {
                        return Observable.error(e);
                    }
                }
            })
            .toBlocking()
            .single();
    } catch (Exception e) {
        Throwable t = e.getCause();
        if (t instanceof ClientException) {
            throw (ClientException) t;
        } else {
            throw new ClientException(e);
        }
    }

}

protected LoadBalancerCommand<T> buildLoadBalancerCommand(final S request, final IClientConfig config) {
    // 创建 RetryHandler
    // RetryHandler 是一种处理程序,用于确定异常是否可供负载平衡器检索,以及异常或错误响应是否应被
    // 视为与电路相关的故障,以便负载平衡器可以避免此类服务器。
    RequestSpecificRetryHandler handler = getRequestSpecificRetryHandler(request, config);
    // 创建负载均衡器命令 Builder
    LoadBalancerCommand.Builder<T> builder = LoadBalancerCommand.<T>builder()
            .withLoadBalancerContext(this)
            .withRetryHandler(handler)
            .withLoadBalancerURI(request.getUri());
    // 默认情况下什么都不做,子类可以实现它实现自定义 builder
    customizeLoadBalancerCommandBuilder(request, config, builder);
    return builder.build();
}

protected void customizeLoadBalancerCommandBuilder(final S request, final IClientConfig config,
        final LoadBalancerCommand.Builder<T> builder) {
    // do nothing by default, give a chance to its derived class to customize the builder
}
注意,LoadBalancerCommand 是一个命令,用于从负载均衡器的执行中生成 Observable 对象。负载均衡器主要负责以下工作:
选择一个服务器
调用 call(com.netflix.loadbalancer.Server) 方法
如果有的话,调用 ExecutionListener
重试异常,由 com.netflix.client.RetryHandler 控制
向 com.netflix.loadbalancer.LoadBalancerStats 提供反馈
实例最后则是解析调用服务后返回的 HttpResponse 对象。

 川公网安备51010802032098