Nacos 按照官方文档配置启动,默认是不需要登录的,这样会导致配置中心对外直接暴露。而启用鉴权之后,需要在使用用户名和密码登录之后,才能正常使用nacos。默认配置如下:
#*************** Access Control Related Configurations ***************#
### If enable spring security, this option is deprecated in 1.2.0:
#spring.security.enabled=false

...

### The auth system to use, currently only 'nacos' and 'ldap' is supported:
nacos.core.auth.system.type=nacos

### If turn on auth system:
nacos.core.auth.enabled=true

...
注意:
(1)Nacos 是一个内部微服务组件,需要在可信的内部网络中运行,不可暴露在公网环境,防止带来安全风险。
(2)Nacos 提供简单的鉴权实现,为防止业务错用的弱鉴权体系,不是防止恶意攻击的强鉴权体系。
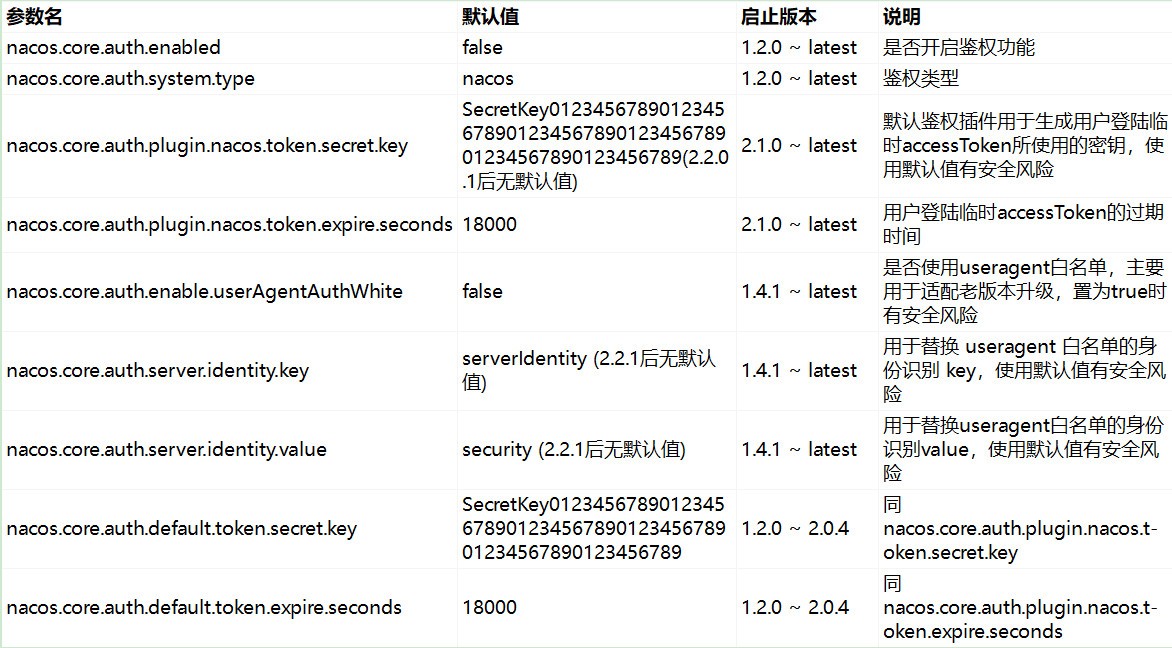
相关参数说明:
开启登录
修改 Nacos 主目录 config/application.properties 文件,修改步骤如下:
(1)启动登录认证功能 原本是 false 修改为 true。
### If turn on auth system:
nacos.core.auth.enabled=true
(2)客户端和服务端交互时用于加密的密钥,可以防止认证过程中的信息泄露。
### Since 1.4.1, worked when nacos.core.auth.enabled=true and nacos.core.auth.enable.userAgentAuthWhite=false.
### The two properties is the white list for auth and used by identity the request from other server.
nacos.core.auth.server.identity.key=yourKey
nacos.core.auth.server.identity.value=yourKey
注意:yourKey 就是秘钥,根据自己需求填写。
(3)设置 Token 认证的密钥
### The default token (Base64 String):
nacos.core.auth.plugin.nacos.token.secret.key=VGhpc0lzTXlDdXN0b21TZWNyZXRLZXkwMTIzNDU2Nzg=
注意:这里设置的秘钥长度必须大于等于 32 字节,并且使用 Base64 加密,例如:VGhpc0lzTXlDdXN0b21TZWNyZXRLZXkwMTIzNDU2Nzg= 实际字符串为 ThisIsMyCustomSecretKey012345678
(4)重启 Nacos 服务。
登录 Nacos
注意,Nacos 默认的账号和密码均为 nacos。
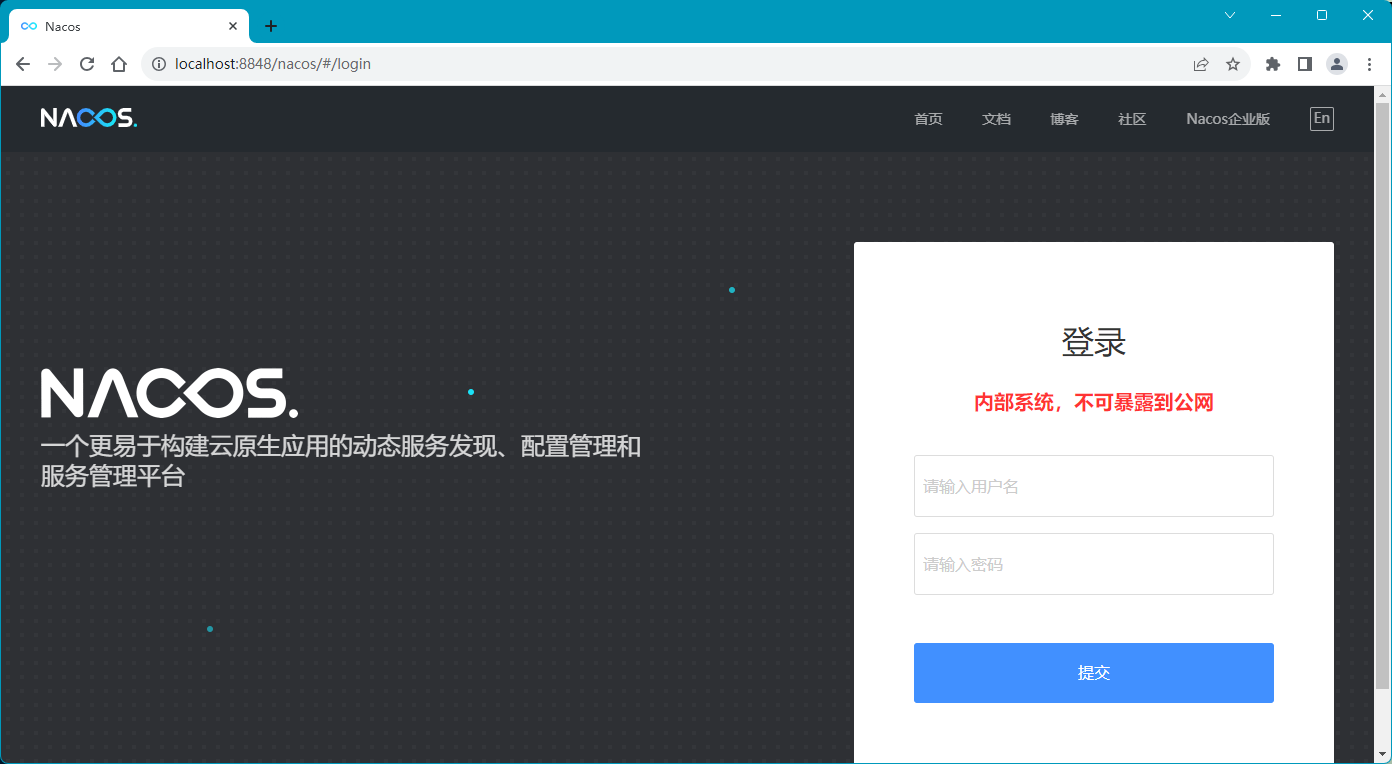
使用浏览器再次访问 http://127.0.0.1:8848/nacos 将跳转到登录页面,如下图:
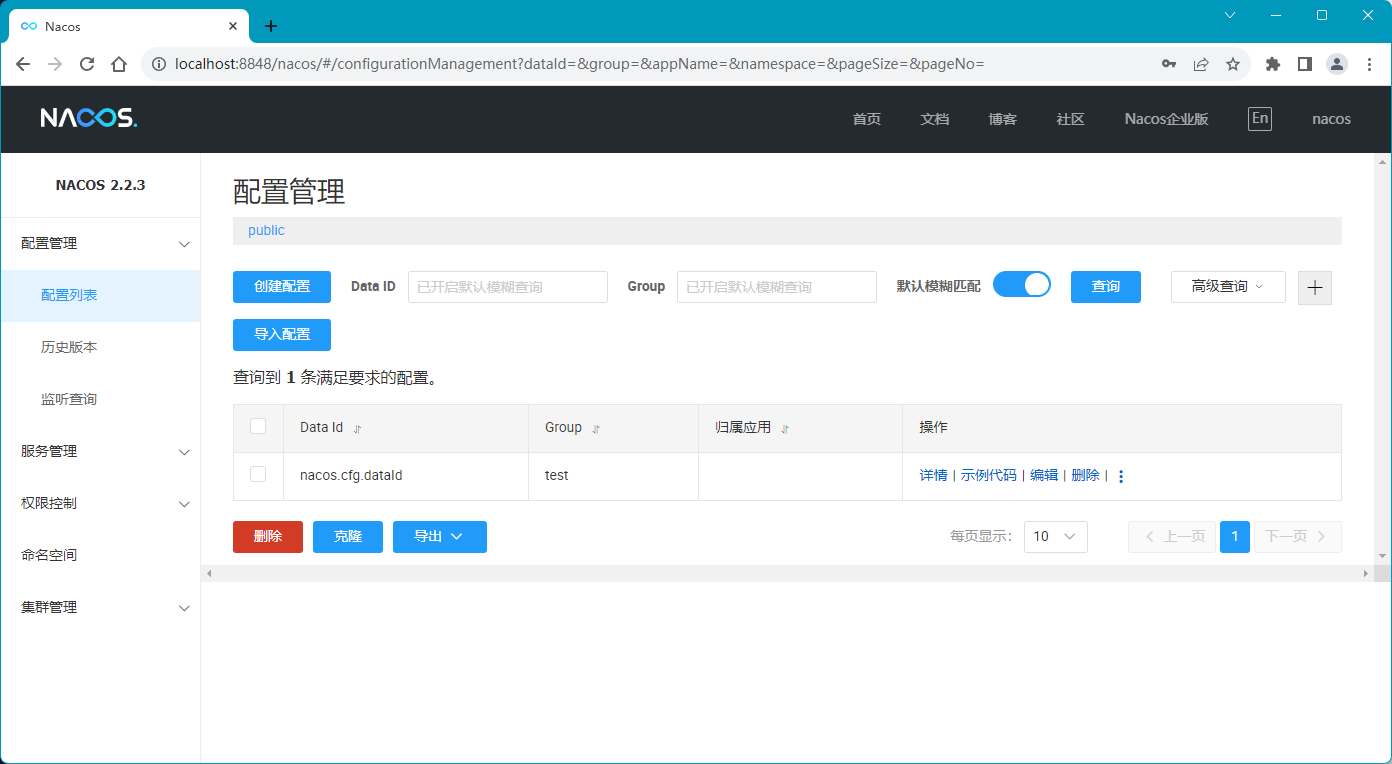
依次输入用户名:nacos,密码:nacos,点击 “提交” 按钮登录到 Nacos,如下图:
修改登录密码
方式一:界面方式
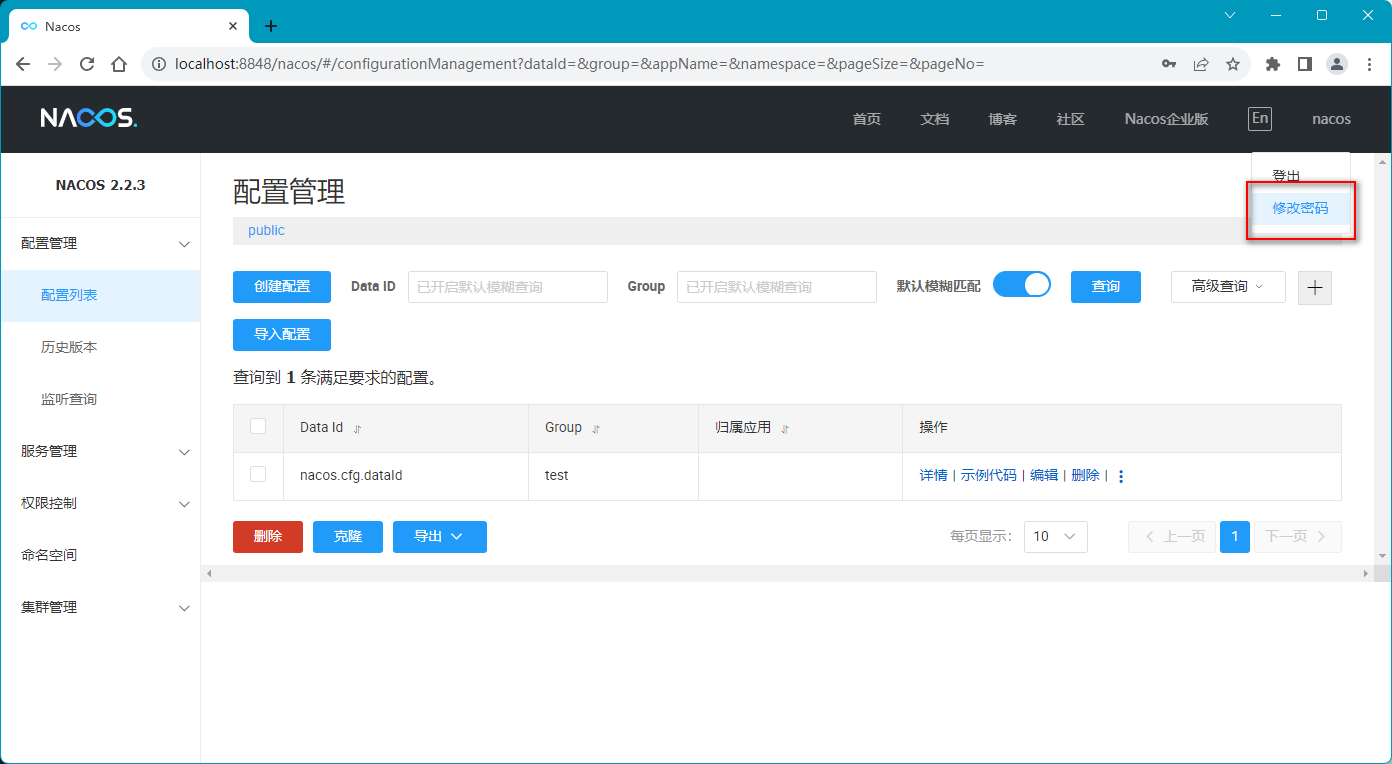
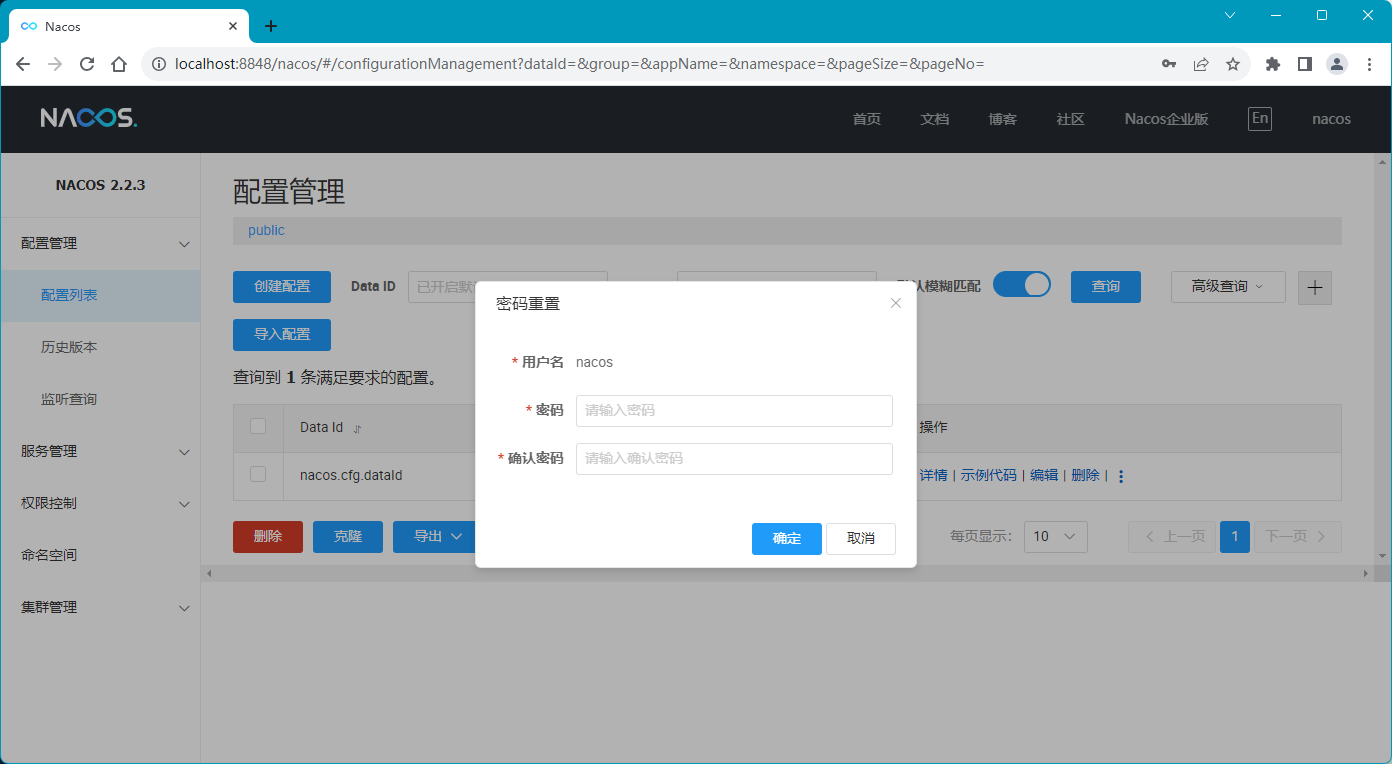
登录到 Nacos 服务,点击右上角的 nacos 用户名,选择下拉菜单 “修改密码”,如下图:
填写密码和确认密码,点击 “确认” 即可,如下图:
方式二:手动方式
Nacos 登录密码采用的是 Bcrypt 加密算法。Bcrypt 是由 Niels Provos 和 David Mazières 设计的密码哈希函数,他是基于 Blowfish 密码而来的,并于 1999 年在 USENIX 上提出。
除了加盐来抵御 rainbow table 攻击之外,Bcrypt 的一个非常重要的特征就是自适应性,可以保证加密的速度在一个特定的范围内,即使计算机的运算能力非常高,可以通过增加迭代次数的方式,使得加密速度变慢,从而可以抵御暴力搜索攻击。
bcrypt 函数是OpenBSD和其他系统包括一些 Linux 发行版(如SUSE Linux)的默认密码哈希算法。
我们可以通过 nacos 的源码确认这一点,部分源码代码如下:
/**
* User related methods entry.
*
* @author wfnuser
* @author nkorange
*/
@RestController("user")
@RequestMapping({"/v1/auth", "/v1/auth/users"})
public class UserController {
   //....

   // 更新密码接口
   /**
    * Update password.
    *
    * @param oldPassword old password
    * @param newPassword new password
    * @return Code 200 if update successfully, Code 401 if old password invalid, otherwise 500
    */
   @PutMapping("/password")
   @Deprecated
   public RestResult<String> updatePassword(@RequestParam(value = "oldPassword") String oldPassword,
           @RequestParam(value = "newPassword") String newPassword) {
       Object principal = SecurityContextHolder.getContext().getAuthentication().getPrincipal();
       String username = ((UserDetails) principal).getUsername();
       User user = userDetailsService.getUserFromDatabase(username);
       String password = user.getPassword();

       // TODO: throw out more fine grained exceptions
       try {
           if (PasswordEncoderUtil.matches(oldPassword, password)) {
               // 看这里,使用 PasswordEncoderUtil.encode 加密生成密码
               userDetailsService.updateUserPassword(username, PasswordEncoderUtil.encode(newPassword));
               return RestResultUtils.success("Update password success");
           }
           return RestResultUtils.failed(HttpStatus.UNAUTHORIZED.value(), "Old password is invalid");
       } catch (Exception e) {
           return RestResultUtils.failed(HttpStatus.INTERNAL_SERVER_ERROR.value(), "Update userpassword failed");
       }
   }

   //...
}
PasswordEncoderUtil 类的实现如下:
package com.alibaba.nacos.plugin.auth.impl.utils;

import org.springframework.security.crypto.bcrypt.BCryptPasswordEncoder;

/**
* Password encoder tool.
*
* @author nacos
*/
public class PasswordEncoderUtil {

   public static Boolean matches(String raw, String encoded) {
       return new BCryptPasswordEncoder().matches(raw, encoded);
   }

   public static String encode(String raw) {
       // 看这里
       return new BCryptPasswordEncoder().encode(raw);
   }
}
接下来,通过 spring-security-crypto 中的 BCryptPasswordEncoder 工具类来生成一个新密码,依赖如下:
<dependency>
    <groupId>org.springframework.security</groupId>
    <artifactId>spring-security-crypto</artifactId>
    <version>5.3.5.RELEASE</version>
</dependency>
编写一个工具类,代码如下:
package com.hxstrive.nacos;

import org.springframework.security.crypto.bcrypt.BCryptPasswordEncoder;

/**
* 手动生成登录密码
* @author hxstrive.com
*/
public class EncodeTool {

   public static void main(String[] args) {
       // 旧密码:$10$EuWPZHzz32dJN7jexM34MOeYirDdFAZm2kuWj7VEOJhhZkDrxfvUu
       String password = new BCryptPasswordEncoder().encode("123456");
       System.out.println(password);
   }

}
运行示例,输出如下:
$2a$10$Zm7VfvIRmb/5QDHmRHieUOqo7UDOVvkiMrh.1XpVjW0z.vtKN3BfK
这就是新的密码了,使用数据库工具连接到 MySQL 服务,找到 nacos 的 users 表将新密码设备给 nacos 用户。如下图:
最后,登出 Nacos,在登录页面输入用户名 nacos 和密码 123456 即可登录了。
注意:修改用户密码后不需要重启 Nacos 服务。
权限配置项说明
nacos.core.auth.enabled
用于控制是否开启登录认证功能。
当 nacos.core.auth.enabled=true 时,Nacos 启动登录认证功能。此时访问 Nacos 服务端 API 和控制台,都需要输入用户名和密码。默认的用户名和密码都是 nacos。
当 nacos.core.auth.enabled=false 时,Nacos 禁用登录认证功能。此时访问 Nacos 服务端 API 和控制台,不需要任何登录,可以匿名访问。
启用认证功能可以提高 Nacos 的安全性,防止服务端被非授权访问。所以对于生产环境中的 Nacos Server,推荐设置为 true。
当认证功能被启用时,如果客户端 (其他服务或控制台用户) 无法提供正确的用户名和密码,将无法访问 Nacos Server。这可以防止非授权用户访问可能的敏感信息。
Nacos 还支持更高级的认证方式,如 LDAP 认证。但基于 username/password 的简单认证已经可以满足大多数安全需求。
理解 Nacos 服务端的各项认证配置,有助于我们保障 Nacos 系统的安全可靠运行。
nacos.core.auth.server.identity.key/value
nacos.core.auth.server.identity.key 用于身份验证的对称加密密钥。
nacos.core.auth.server.identity.value 用于身份验证的对称加密密钥值。
当 Nacos 启用更高级的 LDAP/AD 认证方式时,nacos.core.auth.server.identity.key/value 配置非常重要。它作为客户端和服务端交互时用于加密的密钥,可以防止认证过程中的信息泄露。
如果不配置此项,启动 Nacos 将抛出如下错误信息:
Error creating bean with name 'authConfigs': Invocation of init method failed;
 nested exception is ErrCode:50002, ErrMsg:Empty identity, Please set `nacos.core.auth.server.identity.key`
 and `nacos.core.auth.server.identity.value`, detail: https://nacos.io/zh-cn/docs/v2/guide/user/auth.html
nacos.core.auth.plugin.nacos.token.secret.key
用于设置 Token 认证的密钥,必须配置,长度大于等于 32 字节,并且使用 Base64 编码。
当 Nacos 启用 Token 认证方式时,nacos.core.auth.plugin.nacos.token.secret.key 用于生成和验证 Token。
如果该参数配置错误,将抛出如下错误信息:
[com.alibaba.nacos.plugin.auth.impl.token.impl.JwtTokenManager]: Constructor threw exception;
nested exception is java.lang.IllegalArgumentException:
the length of secret key must great than or equal 32 bytes; And the secret key  must be encoded by base64.