本章节将介绍怎样使用 Spring4 来快速集成 RabbitMQ,集成的详细步骤如下。
集成效果
由于采用传统的 Spring MVC 方式去集成 RabbitMQ,整个项目的代码、配置都比较多。因此,这里先看看集成成功后的效果图:
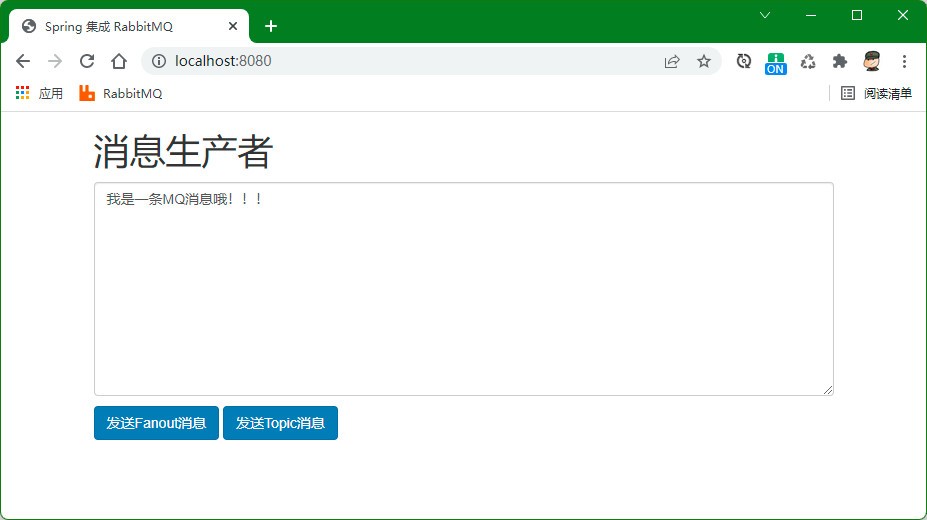
该 Demo 提供了一个 web 界面,该界面允许用户发送 fanout 和 topic 类型的消息到 RabbitMQ。然后,由后台的消费者进行消费。整个项目结构如下图:
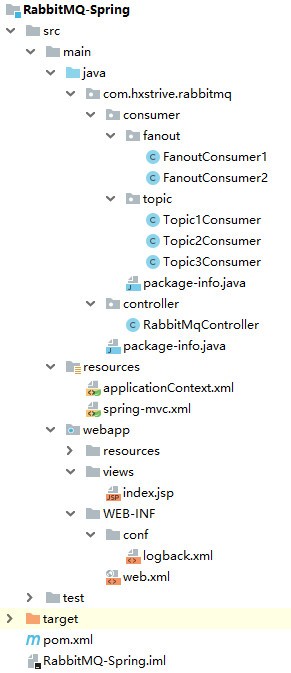
(1)com.hxstrive.rabbitmq.consumer 中定义了示例的消费者,其中:
a、fanout 子包下面用于测试 Fanout 类型的 exchange;
b、topic 子包下面的用于测试 Topic 类型的 exchange。
(2)com.hxstrive.rabbitmq.controller 包定义了一个控制器,该控制器接收前端页面的 ajax 请求,根据请求向 RabbitMQ 发送消息。
(3)main/resouces 目录中:
a、spring-mvc.xml 配置文件用于配置 Spring MVC;
b、applicationContext.xml 配置文件用来配置 RabbitMQ 和 Spring 集成。其中,定义了队列、将队列和 exchange 进行绑定、并且定义 RabbitTemplate 工具类 Bean,供客户端使用。
(4)在 webapp 中:
a、webapp/resources 目录中定义了静态资源,如:jquery 库、bootstrap 库等;
b、views 目录定义 JSP文件;
(5)最后,在 webapp/WEB-INF/conf/logback.xml 中配置日志。
定义消费者
示例中,FanoutConsumer1 和 FanoutConsumer2 类的代码几乎一致,仅仅只有类名称不一致。FanoutConsumer1 代码如下:
import org.springframework.amqp.core.Message;
import org.springframework.amqp.core.MessageListener;
import org.springframework.stereotype.Component;

/**
 * RabbitMQ与Spring集成fanout消费者
 * @author hxstrive.com 2022/2/8
 */
@Component
public class FanoutConsumer1 implements MessageListener{

    public void onMessage(Message message) {
        System.out.println("FanoutConsumer1 Get message:"
                + new String(message.getBody()));
    }

}
Topic1Consumer、Topic2Consumer 和 Topic3Consumer 三者之间的类代码几乎一样,Topic1Consumer 代码如下:
import org.springframework.amqp.core.Message;
import org.springframework.amqp.core.MessageListener;
import org.springframework.stereotype.Component;

/**
 * RabbitMQ与Spring集成topic消费者
 * @author hxstrive.com 2022/2/8
 */
@Component
public class Topic1Consumer implements MessageListener{

    public void onMessage(Message message) {
        System.out.println("Topic1Consumer Get message:"
                + new String(message.getBody()));
    }

}
rabbitmq广告位
applicationContext.xml 配置
<?xml version="1.0" encoding="UTF-8"?>
<beans xmlns="http://www.springframework.org/schema/beans"
       xmlns:xsi="http://www.w3.org/2001/XMLSchema-instance"
       xmlns:context="http://www.springframework.org/schema/context"
       xmlns:rabbit="http://www.springframework.org/schema/rabbit"
       xsi:schemaLocation="
           http://www.springframework.org/schema/beans
           http://www.springframework.org/schema/beans/spring-beans-4.0.xsd
           http://www.springframework.org/schema/context
           http://www.springframework.org/schema/context/spring-context-4.0.xsd
           http://www.springframework.org/schema/rabbit
           http://www.springframework.org/schema/rabbit/spring-rabbit-2.0.xsd">

    <!-- 配置扫描路径 -->
    <context:component-scan base-package="com.hxstrive.rabbitmq">
        <context:exclude-filter type="annotation"
                expression="org.springframework.stereotype.Controller"/>
    </context:component-scan>

    <!-- RabbitMQ 配置 -->
    <bean id="rabbitConnectionFactory"
          class="org.springframework.amqp.rabbit.connection.CachingConnectionFactory">
        <constructor-arg value="127.0.0.1"/>
        <property name="port" value="5672" />
        <property name="username" value="guest"/>
        <property name="password" value="guest"/>
        <property name="channelCacheSize" value="8"/>
    </bean>
    <!-- 定义 RabbitTemplate 对象,方便在代码中发送消息 -->
    <rabbit:template id="rabbitTemplate" connection-factory="rabbitConnectionFactory"/>
    <rabbit:admin connection-factory="rabbitConnectionFactory"/>

    <!-- fanout交换器 begin-->
    <!-- 定义队列 -->
    <rabbit:queue name="fanout1_queue" durable="false"/>
    <rabbit:queue name="fanout2_queue" durable="false"/>
    <!-- 将队列与交换器绑定在一起 -->
    <!--xmlns="http://www.springframework.org/schema/rabbit"-->
    <rabbit:fanout-exchange name="fanout-exchange" durable="false">
        <rabbit:bindings>
            <rabbit:binding queue="fanout1_queue" />
            <rabbit:binding queue="fanout2_queue" />
        </rabbit:bindings>
    </rabbit:fanout-exchange>

    <!-- 定义队列 -->
    <rabbit:queue name="topic1_queue" durable="false"/>
    <rabbit:queue name="topic2_queue" durable="false"/>
    <rabbit:queue name="topic3_queue" durable="false"/>
    <!-- 把需要数据的队列通过路由键与交换器绑定一起 -->
    <rabbit:topic-exchange name="topic-exchange" durable="false">
        <rabbit:bindings>
            <rabbit:binding queue="topic1_queue" pattern="hxstrive.com" />
            <rabbit:binding queue="topic2_queue" pattern="*.hxstrive.*" />
            <rabbit:binding queue="topic3_queue" pattern="www.#.net" />
        </rabbit:bindings>
    </rabbit:topic-exchange>

    <!--监听容器-->
    <rabbit:listener-container connection-factory="rabbitConnectionFactory">
        <rabbit:listener ref="fanoutConsumer1" queues="fanout1_queue" method="onMessage" />
        <rabbit:listener ref="fanoutConsumer2" queues="fanout2_queue" method="onMessage" />
        <rabbit:listener ref="topic1Consumer" queues="topic1_queue" method="onMessage" />
        <rabbit:listener ref="topic2Consumer" queues="topic2_queue" method="onMessage" />
        <rabbit:listener ref="topic3Consumer" queues="topic3_queue" method="onMessage" />
    </rabbit:listener-container>

</beans>
spring-mvc.xml 配置
<?xml version="1.0" encoding="UTF-8"?>
<beans xmlns="http://www.springframework.org/schema/beans"
       xmlns:context="http://www.springframework.org/schema/context"
       xmlns:mvc="http://www.springframework.org/schema/mvc"
       xmlns:xsi="http://www.w3.org/2001/XMLSchema-instance"
       xsi:schemaLocation="http://www.springframework.org/schema/beans
        http://www.springframework.org/schema/beans/spring-beans-4.0.xsd
        http://www.springframework.org/schema/context
        http://www.springframework.org/schema/context/spring-context-4.0.xsd
        http://www.springframework.org/schema/mvc
        http://www.springframework.org/schema/mvc/spring-mvc-4.0.xsd">

    <!-- 启用MVC注解 -->
    <mvc:annotation-driven />

    <!-- 静态资源文件,不会被Spring MVC拦截 -->
    <mvc:resources location="/resources/" mapping="/resources/**"/>

    <!-- 指定Sping组件扫描的基本包路径 -->
    <context:component-scan base-package="com.hxstrive.rabbitmq" >
        <!-- 这里只扫描Controller,不可重复加载Service -->
        <context:include-filter type="annotation"
                                expression="org.springframework.stereotype.Controller"/>
    </context:component-scan>

    <!-- JSP视图解析器-->
    <bean class="org.springframework.web.servlet.view.InternalResourceViewResolver">
        <property name="prefix" value="/WEB-INF/views/" />
        <property name="suffix" value=".jsp" />
        <!--  定义其解析视图的order顺序为1 -->
        <property name="order" value="1" />
    </bean>

</beans>
RabbitMqController 控制器
import org.springframework.amqp.core.Message;
import org.springframework.amqp.core.MessageProperties;
import org.springframework.amqp.rabbit.core.RabbitTemplate;
import org.springframework.beans.factory.annotation.Autowired;
import org.springframework.stereotype.Controller;
import org.springframework.web.bind.annotation.RequestMapping;
import org.springframework.web.bind.annotation.RequestParam;
import org.springframework.web.bind.annotation.ResponseBody;

/**
 * RabbitMQ与Spring集成发送消息控制器
 * @author hxstrive.com 2022/2/8
 */
@Controller
@RequestMapping("/rabbitmq")
public class RabbitMqController {

    @Autowired
    private RabbitTemplate rabbitTemplate;

    @ResponseBody
    @RequestMapping("/fanoutSender")
    public String fanoutSender(@RequestParam("message")String message){
        String ret="";
        try {
            String str = "Fanout, The message is : " + message;
            rabbitTemplate.send("fanout-exchange","",
                    new Message(str.getBytes(), new MessageProperties()));
            ret = "success";
        } catch (Exception e) {
            ret = e.getCause().toString();
        }
        return ret;
    }

    @ResponseBody
    @RequestMapping("/topicSender")
    public String topicSender(@RequestParam("message")String message){
        String ret="";
        try {
            String routeKey = "hxstrive.com";
            String str = "The message is [rk:" + routeKey + "][" + message + "]";
            rabbitTemplate.send("topic-exchange", routeKey,
                    new Message(str.getBytes(), new MessageProperties()));

            routeKey = "www.hxstrive.com";
            str = "The message is [rk:" + routeKey + "][" + message + "]";
            rabbitTemplate.send("topic-exchange", routeKey,
                    new Message(str.getBytes(), new MessageProperties()));

            routeKey = "www.hxstrive.net";
            str = "The message is [rk:" + routeKey + "][" + message + "]";
            rabbitTemplate.send("topic-exchange", routeKey,
                    new Message(str.getBytes(), new MessageProperties()));

            ret = "success";
        } catch (Exception e) {
            ret = e.getCause().toString();
        }
        return ret;
    }

}
web.xml 配置
<web-app xmlns:xsi="http://www.w3.org/2001/XMLSchema-instance"
         xmlns="http://java.sun.com/xml/ns/javaee"
         xmlns:web="http://java.sun.com/xml/ns/javaee/web-app_3_0.xsd"
         xsi:schemaLocation="http://java.sun.com/xml/ns/javaee
            http://java.sun.com/xml/ns/javaee/web-app_3_0.xsd"
         version="3.0">
    <display-name>RabbitMqSpringConsumerDemo</display-name>

    <welcome-file-list>
        <welcome-file>views/index.jsp</welcome-file>
    </welcome-file-list>

    <context-param>
        <param-name>logbackConfigLocation</param-name>
        <param-value>/WEB-INF/conf/logback.xml</param-value>
    </context-param>

    <!-- Spring 编码过滤器 start -->
    <filter>
        <filter-name>characterEncoding</filter-name>
        <filter-class>org.springframework.web.filter.CharacterEncodingFilter</filter-class>
        <init-param>
            <param-name>encoding</param-name>
            <param-value>UTF-8</param-value>
        </init-param>
        <init-param>
            <param-name>forceEncoding</param-name>
            <param-value>true</param-value>
        </init-param>
    </filter>
    <filter-mapping>
        <filter-name>characterEncoding</filter-name>
        <url-pattern>/*</url-pattern>
    </filter-mapping>

    <!-- Spring Application Context Listener -->
    <context-param>
        <param-name>contextConfigLocation</param-name>
        <param-value>classpath:applicationContext.xml</param-value>
    </context-param>
    <listener>
        <listener-class>org.springframework.web.context.ContextLoaderListener</listener-class>
    </listener>

    <!-- Spring MVC Config -->
    <servlet>
        <servlet-name>SpringMVC</servlet-name>
        <servlet-class>org.springframework.web.servlet.DispatcherServlet</servlet-class>
        <init-param>
            <param-name>contextConfigLocation</param-name>
            <param-value>classpath:spring-mvc.xml</param-value>
        </init-param>
        <load-on-startup>1</load-on-startup>
    </servlet>
    <servlet-mapping>
        <servlet-name>SpringMVC</servlet-name>
        <url-pattern>/</url-pattern>
    </servlet-mapping>

</web-app>
index.jsp 页面
<%@ page language="java" import="java.util.*" pageEncoding="UTF-8"%>
<%
    String path = request.getContextPath();
    String basePath = request.getScheme() + "://"
            + request.getServerName() + ":" + request.getServerPort()
            + path + "/";
%>
<!DOCTYPE HTML PUBLIC "-//W3C//DTD HTML 4.01 Transitional//EN">
<html>
<head>
    <base href="<%=basePath%>">
    <title>Spring 集成 RabbitMQ</title>
    <meta http-equiv="pragma" content="no-cache">
    <meta http-equiv="cache-control" content="no-cache">
    <meta http-equiv="expires" content="0">
    <link rel="stylesheet" type="text/css" href="<%=basePath%>/resources/js/bootstrap-3.3.7-dist/css/bootstrap.css">
    <script type="text/javascript" src="<%=basePath%>/resources/js/jquery-2.1.0.js"></script>
    <script type="text/javascript" src="<%=basePath%>/resources/js/bootstrap-3.3.7-dist/js/bootstrap.js"></script>
    <style type="text/css">
        .success {color:green;}
        .error {color:red;}
    </style>
</head>
<body>
    <div id="producer" style="width:80%;margin-left:10%;">
        <h2 class="h1">消息生产者</h2>
        <p>
            <textarea id="message" class="form-control"
                    cols="40" rows="10">我是一条MQ消息哦!!!</textarea>
        </p>
        <p>
            <button class="btn btn-primary" onclick="send('fanoutSender')">发送Fanout消息</button>
            <button class="btn btn-primary" onclick="send('topicSender')">发送Topic消息</button>
        </p>
        <p>
            <span id="status"></span>
        </p>
    </div>
    <script type="text/javascript">
        function send(controller){
            var message = $.trim($("#message").val());
            if(message === "") {
                alert("不能发送空消息");
                return;
            }
            $.ajax({
                type: 'post',
                url:'<%=basePath%>rabbitmq/' + controller,
                dataType:'text',
                data:{
                    "message": message
                },
                success:function(data){
                    if(data === "success"){
                        $("#status").css("color", "green").text("发送成功");
                        setTimeout(clear, 3000);
                    }else{
                        $("#status").css("color", "red").text(data);
                        setTimeout(clear, 5000);
                    }
                },
                error:function(data){
                    $("#status").css("color", "red").text("ERROR:" + data["status"] + ","
                        + data["statusText"]);
                    setTimeout(clear, 5000);
                }
            });
        }

        function clear(){
            $("#status").text("");
        }
    </script>
</body>
</html>
点击下载项目示例源码。

 川公网安备51010802032098