本章节将介绍怎样使用 RestTemplate 调用 Eureka client 注册到 Eureka server 注册中心中的服务。我们先看看项目结构,如下图:
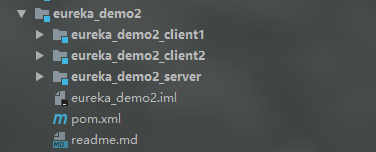
上图中,总共创建“eureka_demo2_server”、“eureka_demo2_client2”和“eureka_demo2_client1”三个模块,其中“eureka_demo2_server”为注册中心,eureka_demo2_client2”和 eureka_demo2_client1”是 Eureka client 客户端。
创建 eureka_demo2_server 模块
(1)项目怎样创建这里不再赘述,如果不清楚请参考“Eureka server 简单实例”。
(2)配置 Eureka server,在 application.properties 文件中添加如下配置信息:
# 服务端口
server.port=8077
# 服务名称
spring.application.name=eureka-server
# 服务地址
eureka.instance.hostname=localhost
# 不向注册中心注册自己
eureka.client.register-with-eureka=false
# 取消检索服务
eureka.client.fetch-registry=false
# 开启注册中心的保护机制,默认是开启
eureka.server.enable-self-preservation=true
# 设置保护机制的阈值,默认是0.85。
eureka.server.renewal-percent-threshold=0.5
(3)在启动类上添加 @EnableEurekaServer 注解,完整代码如下:
import org.springframework.boot.SpringApplication;
import org.springframework.boot.autoconfigure.SpringBootApplication;
import org.springframework.cloud.netflix.eureka.server.EnableEurekaServer;

@SpringBootApplication
@EnableEurekaServer
public class EurekaServerApplication {

    public static void main(String[] args) {
        SpringApplication.run(EurekaServerApplication.class, args);
    }

}
创建 eureka_demo2_client1 模块
(1)项目怎样创建这里不再赘述,如果不清楚请参考“Eureka client 简单实例”。
(2)配置 Eureka server,在 application.properties 文件中添加如下配置信息:
# 服务端口
server.port=7001
# 服务名称
spring.application.name=client1
# 服务地址
eureka.instance.hostname=localhost
# 注册中心路径,表示我们向这个注册中心注册服务,如果向多个注册中心注册,用“,”进行分隔
eureka.client.serviceUrl.defaultZone=http://localhost:8077/eureka
# 心跳间隔5s,默认30s。每一个服务配置后,心跳间隔和心跳超时时间会被保存在server端,不同服务的心跳频率可能不同,server端会根据保存的配置来分别探活
eureka.instance.lease-renewal-interval-in-seconds=5
# 心跳超时时间10s,默认90s。从client端最后一次发出心跳后,达到这个时间没有再次发出心跳,表示服务不可用,将它的实例从注册中心移除
eureka.instance.lease-expiration-duration-in-seconds=10
(3)在启动类上面添加 @RestController 和 @EnableEurekaClient 注解,然后实现两个 Restful 接口(index() 和 getDate())。代码如下:
import org.springframework.beans.factory.annotation.Autowired;
import org.springframework.boot.SpringApplication;
import org.springframework.boot.autoconfigure.SpringBootApplication;
import org.springframework.cloud.client.loadbalancer.LoadBalanced;
import org.springframework.cloud.netflix.eureka.EnableEurekaClient;
import org.springframework.context.annotation.Bean;
import org.springframework.http.ResponseEntity;
import org.springframework.web.bind.annotation.GetMapping;
import org.springframework.web.bind.annotation.RestController;
import org.springframework.web.client.RestTemplate;
import java.text.SimpleDateFormat;
import java.util.Date;

@RestController
@SpringBootApplication
@EnableEurekaClient
public class EurekaClient1Application {

    // 配置 RestTemplate
    // 注意:RestTemplate 需要配合 @LoadBalanced 才能通过服务名 spring.application.name 解析到具体的服务上
    @Bean
    @LoadBalanced
    public RestTemplate restTemplate() {
        return new RestTemplate();
    }

    @Autowired
    private RestTemplate restTemplate;

    public static void main(String[] args) {
        SpringApplication.run(EurekaClient1Application.class, args);
    }

    @GetMapping({"/", "/index.html"})
    public String index() {
        // 调用 client2 服务提供的服务
        String url = "http://CLIENT2/date/getDate";
        ResponseEntity<String> entity = restTemplate.getForEntity(url, String.class);
        return entity.getBody();
    }

    // 该方法供其他客户端调用
    @GetMapping("/date/getDate")
    public String getDate() {
        return "From Client1 " + new SimpleDateFormat(
                "yyyy-MM-dd HH:mm:ss").format(new Date());
    }

}
springcloud广告位
创建 eureka_demo2_client2 模块
(1)项目怎样创建这里不再赘述,如果不清楚请参考“Eureka client 简单实例”。
(2)配置 Eureka server,在 application.properties 文件中添加如下配置信息:
# 服务端口
server.port=7002
# 服务名称
spring.application.name=client2
# 服务地址
eureka.instance.hostname=localhost
# 注册中心路径,表示我们向这个注册中心注册服务,如果向多个注册中心注册,用“,”进行分隔
eureka.client.serviceUrl.defaultZone=http://localhost:8077/eureka
# 心跳间隔5s,默认30s。每一个服务配置后,心跳间隔和心跳超时时间会被保存在server端,不同服务的心跳频率可能不同,server端会根据保存的配置来分别探活
eureka.instance.lease-renewal-interval-in-seconds=5
# 心跳超时时间10s,默认90s。从client端最后一次发出心跳后,达到这个时间没有再次发出心跳,表示服务不可用,将它的实例从注册中心移除
eureka.instance.lease-expiration-duration-in-seconds=10
(3)在启动类上面添加 @RestController 和 @EnableEurekaClient 注解,然后实现两个 Restful 接口(index() 和 getDate())。代码如下:
import org.springframework.beans.factory.annotation.Autowired;
import org.springframework.boot.SpringApplication;
import org.springframework.boot.autoconfigure.SpringBootApplication;
import org.springframework.cloud.client.loadbalancer.LoadBalanced;
import org.springframework.cloud.netflix.eureka.EnableEurekaClient;
import org.springframework.context.annotation.Bean;
import org.springframework.http.ResponseEntity;
import org.springframework.web.bind.annotation.GetMapping;
import org.springframework.web.bind.annotation.RestController;
import org.springframework.web.client.RestTemplate;

import java.text.SimpleDateFormat;
import java.util.Date;

@RestController
@SpringBootApplication
@EnableEurekaClient
public class EurekaClient2Application {

    // 配置 RestTemplate
    // 注意:RestTemplate 需要配合 @LoadBalanced 才能通过服务名 spring.application.name 解析到具体的服务上
    @Bean
    @LoadBalanced
    public RestTemplate restTemplate() {
        return new RestTemplate();
    }

    @Autowired
    private RestTemplate restTemplate;

    public static void main(String[] args) {
        SpringApplication.run(EurekaClient2Application.class, args);
    }

    @GetMapping({"/", "/index.html"})
    public String index() {
        // 调用 client1 服务提供的服务
        String url = "http://CLIENT1/date/getDate";
        ResponseEntity<String> entity = restTemplate.getForEntity(url, String.class);
        return entity.getBody();
    }

    // 该方法供其他客户端调用
    @GetMapping("/date/getDate")
    public String getDate() {
        return "From Client2 " + new SimpleDateFormat(
                "yyyy-MM-dd HH:mm:ss").format(new Date());
    }

}
运行项目
上面已经完成三个模块的创建和配置开发工作,下面依次启动“eureka_demo2_server”、“eureka_demo2_client2”和“eureka_demo2_client1”三个模块。然后使用浏览器打开“http://localhost:8077” 地址,你会发现“Instances currently registered with Eureka”表面的表格多了两行数据,如下图:
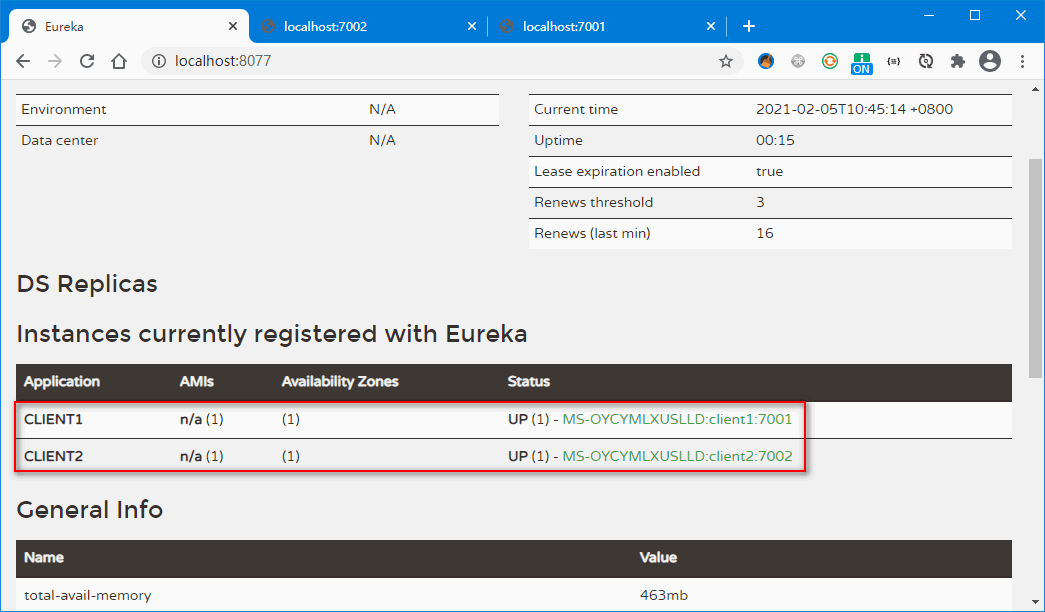
上图中,CLIENT1 和 CLIENT2 为应用名称。后面我们调用服务时需要使用该名称进行调用,注意:调用服务时的应用名称必须和上面提供的服务名称一致,是区分大小写的。
在浏览器再次访问“http://localhost:7002” 和 “http://localhost:7001” 地址,调用结果如下图:


从上图中得知,我们在 client1 中成功调用了 CLIENT2,在 client2 中成功调用了 CLIENT1。后续章节将介绍 Eureka client 负载均衡调用……

 川公网安备51010802032098