@SpringBootApplication 注解是 Spring Boot 最核心、最基础的注解。本文将详细介绍该注解的用法,以及注解的作用和注意事项。下面是官方给出的描述:
Indicates a configuration class that declares one or more @Bean methods and also triggers auto-configuration and component scanning. This is a convenience annotation that is equivalent to declaring @Configuration, @EnableAutoConfiguration and @ComponentScan.
表示一个配置类,该类声明一个或多个 @Bean 方法,并且还触发自动配置和组件扫描。这是一个便捷注释,等效于声明 @Configuration,@EnableAutoConfiguration 和 @ComponentScan 三个注解。其中:
@Configuration
该注解表示一个类声明了一个或多个 @Bean 方法,并且可以由 Spring 容器进行处理,以在运行时为这些 bean 生成 bean 定义和服务请求,例如:
@Configuration
 public class AppConfig {
     @Bean
     public MyBean myBean() {
         // 实例化,配置并返回Bean ...
     }
 }
@EnableAutoConfiguration
启用Spring Application Context的自动配置,尝试猜测和配置您可能需要的bean。通常根据您的类路径和定义的 bean 来应用自动配置类。例如,如果您在类路径上具有tomcat-embedded.jar,则可能需要TomcatServletWebServerFactory(除非已定义自己的ServletWebServerFactory bean)。
@ComponentScan
配置组件扫描指令以与 @Configuration 类一起使用。 提供与 Spring XML <contextcomponent-scan> 元素并行的支持。可以指定 basePackageClasses() 或 basePackages()(或其别名 value())来定义要扫描的特定程序包。如果未定义特定的程序包,则将从声明此批注的类的程序包中进行扫描。
springboot广告位
@SpringBootApplication 注解源码
下面将分析 SpringBootApplication 注解源代码,如下:
package org.springframework.boot.autoconfigure;

import java.lang.annotation.Documented;
import java.lang.annotation.ElementType;
import java.lang.annotation.Inherited;
import java.lang.annotation.Retention;
import java.lang.annotation.RetentionPolicy;
import java.lang.annotation.Target;

import org.springframework.boot.SpringBootConfiguration;
import org.springframework.boot.context.TypeExcludeFilter;
import org.springframework.context.annotation.Bean;
import org.springframework.context.annotation.ComponentScan;
import org.springframework.context.annotation.ComponentScan.Filter;
import org.springframework.context.annotation.Configuration;
import org.springframework.context.annotation.FilterType;
import org.springframework.core.annotation.AliasFor;

/**
 * Indicates a {@link Configuration configuration} class that declares one or more
 * {@link Bean @Bean} methods and also triggers {@link EnableAutoConfiguration
 * auto-configuration} and {@link ComponentScan component scanning}. This is a convenience
 * annotation that is equivalent to declaring {@code @Configuration},
 * {@code @EnableAutoConfiguration} and {@code @ComponentScan}.
 *
 * @author Phillip Webb
 * @author Stephane Nicoll
 * @since 1.2.0
 */
@Target(ElementType.TYPE)
@Retention(RetentionPolicy.RUNTIME)
@Documented
@Inherited
@SpringBootConfiguration
@EnableAutoConfiguration
@ComponentScan(excludeFilters = {
      @Filter(type = FilterType.CUSTOM, classes = TypeExcludeFilter.class),
      @Filter(type = FilterType.CUSTOM, classes = AutoConfigurationExcludeFilter.class) })
public @interface SpringBootApplication {

   /**
    * Exclude specific auto-configuration classes such that they will never be applied.
    * @return the classes to exclude
    */
   @AliasFor(annotation = EnableAutoConfiguration.class)
   Class<?>[] exclude() default {};

   /**
    * Exclude specific auto-configuration class names such that they will never be
    * applied.
    * @return the class names to exclude
    * @since 1.3.0
    */
   @AliasFor(annotation = EnableAutoConfiguration.class)
   String[] excludeName() default {};

   /**
    * Base packages to scan for annotated components. Use {@link #scanBasePackageClasses}
    * for a type-safe alternative to String-based package names.
    * @return base packages to scan
    * @since 1.3.0
    */
   @AliasFor(annotation = ComponentScan.class, attribute = "basePackages")
   String[] scanBasePackages() default {};

   /**
    * Type-safe alternative to {@link #scanBasePackages} for specifying the packages to
    * scan for annotated components. The package of each class specified will be scanned.
    * <p>
    * Consider creating a special no-op marker class or interface in each package that
    * serves no purpose other than being referenced by this attribute.
    * @return base packages to scan
    * @since 1.3.0
    */
   @AliasFor(annotation = ComponentScan.class, attribute = "basePackageClasses")
   Class<?>[] scanBasePackageClasses() default {};

}
首先,SpringBootApplication 注解上面添加了下面三个注解,分别如下:
@Target(ElementType.TYPE)
@Retention(RetentionPolicy.RUNTIME)
@Documented
@Configuration
public @interface SpringBootConfiguration {

}
其次,介绍该注解提供的属性,如下:
Class<?>[] exclude():排除特定的自动配置类,使其永远不会应用。
String[] excludeName():排除特定的自动配置类名称,以使它们永远不会应用。
String[] scanBasePackages():基本软件包以扫描带注释的组件。
Class<?>[] scanBasePackageClasses():scanBasePackages() 的类型安全替代方法,用于指定要扫描的组件以扫描带注释的组件。
基础用法
假如我们创建了一个 Spring Boot 项目,该项目将使用 MyBatis 作为数据库框架。项目结构如下图:
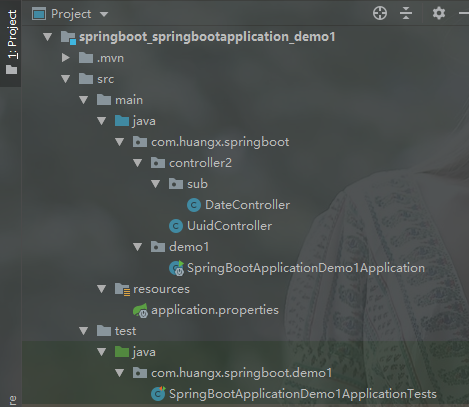
项目中,我们在 Spring Boot 主类的上个包中创建 controller2 包(存放控制器,存在子包)。SpringBootApplicationDemo1Application 类的代码如下:
package com.huangx.springboot.demo1;

import org.springframework.boot.SpringApplication;
import org.springframework.boot.autoconfigure.SpringBootApplication;
import org.springframework.web.bind.annotation.RequestMapping;
import org.springframework.web.bind.annotation.RestController;
import java.text.SimpleDateFormat;
import java.util.Date;

@SpringBootApplication
@RestController
public class SpringBootApplicationDemo1Application {
    private static final SimpleDateFormat DATE_FORMAT = new SimpleDateFormat("yyyy-MM-dd HH:mm:ss.SSS");

    public static void main(String[] args) {
        SpringApplication.run(SpringBootApplicationDemo1Application.class, args);
    }

    @RequestMapping("/")
    public String index() {
        return DATE_FORMAT.format(new Date()) + " - hi! spring boot. ";
    }
}
(1)如果在我们没有配置数据库信息系时,直接运行 Spring Boot 将抛出如下错误信息:
Failed to configure a DataSource: 'url' attribute is not specified and no embedded datasource could be configured.
Reason: Failed to determine a suitable driver class
为了解决上面的问题,可使用 exclude 属性过滤数据库自动加载配置,代码如下:
@SpringBootApplication(
    exclude = {
        DataSourceAutoConfiguration.class,
        DataSourceTransactionManagerAutoConfiguration.class,
        HibernateJpaAutoConfiguration.class
    }
)
@RestController
public class SpringBootApplicationDemo1Application {
    // ... 省略 ...
}
你也可使用 excludeName 属性过滤数据库自动加载配置,代码如下:
@SpringBootApplication(
    excludeName = {
        "org.springframework.boot.autoconfigure.jdbc.DataSourceAutoConfiguration",
        "org.springframework.boot.autoconfigure.jdbc.DataSourceTransactionManagerAutoConfiguration",
        "org.springframework.boot.autoconfigure.orm.jpa.HibernateJpaAutoConfiguration"
    }
)
@RestController
public class SpringBootApplicationDemo1Application {
    // ... 省略 ...
}
(2)我们先来看看 UuidController 类的代码:
package com.huangx.springboot.controller2;

import org.springframework.web.bind.annotation.RequestMapping;
import org.springframework.web.bind.annotation.RestController;
import java.util.UUID;

@RestController
@RequestMapping("/uuid")
public class UuidController {

    @RequestMapping("/next")
    public String next() {
        return UUID.randomUUID().toString();
    }

}
当你尝试访问 UuidController 中的“/uuid/next”时,将抛出如下错误:
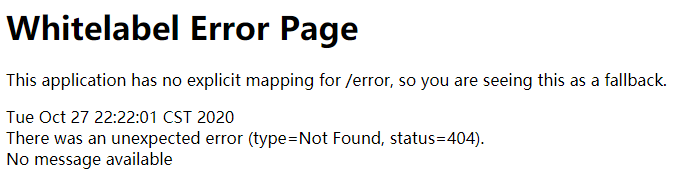
之所以会出现 404 错误,是因为我们将 controller2 包放到了 Spring Boot 启动类的上层包中。为了解决这个问题,我们可以使用 scanBasePackages 扫描指定的包,以及子包。代码如下:
@SpringBootApplication(
    exclude = {
        DataSourceAutoConfiguration.class,
        DataSourceTransactionManagerAutoConfiguration.class,
        HibernateJpaAutoConfiguration.class
    },
    scanBasePackages = { "com.huangx.springboot.controller2" }
)
或者使用 scanBasePackageClasses 扫描指定的包,以及子包。代码如下:
@SpringBootApplication(
    exclude = {
        DataSourceAutoConfiguration.class,
        DataSourceTransactionManagerAutoConfiguration.class,
        HibernateJpaAutoConfiguration.class
    },
    scanBasePackageClasses = { UuidController.class }
)
注意:scanBasePackages 和 scanBasePackageClasses 是能够扫描子包的。例如:先看看 DateController 类的代码,如下:
package com.huangx.springboot.controller2.sub;

import org.springframework.web.bind.annotation.RequestMapping;
import org.springframework.web.bind.annotation.RestController;
import java.text.SimpleDateFormat;
import java.util.Date;

@RequestMapping("/date")
@RestController
public class DateController {
    private static final SimpleDateFormat DATE_FORMAT =
            new SimpleDateFormat("yyyy-MM-dd HH:mm:ss.SSS");

    @RequestMapping("/getDate")
    public String getDate() {
        return DATE_FORMAT.format(new Date());
    }

}
然后尝试访问“http://localhost:8080/date/getDate”,依然访问成功了。

 川公网安备51010802032098
ojbk
??