@ComponentScan 注解其实很简单,它主要就是定义扫描的包路径,然后从中找出标识了需要装配的类自动装配到Spring的Bean容器。
如果你做过 Web开发,一定都有用过 @Controller,@Service,@Repository 等注解,查看这些注解的源码你会发现,他们中都有一个共同的注解 @Component。没错 @ComponentScan 注解默认就会装配标识了 @Controller、@Service、@Repository 和 @Component 注解的类到 Spring 容器中。
下面将逐一查看 @Controller、@Service 和 @Repository 注解的源码:
(1)@Controller 注解源码:
@Target({ElementType.TYPE})
@Retention(RetentionPolicy.RUNTIME)
@Documented
@Component
public @interface Controller {
	@AliasFor(annotation = Component.class)
	String value() default "";
}
(2)@Service 注解源码:
@Target({ElementType.TYPE})
@Retention(RetentionPolicy.RUNTIME)
@Documented
@Component
public @interface Service {
	@AliasFor(annotation = Component.class)
	String value() default "";
}
(3)@Repository 注解源码:
@Target({ElementType.TYPE})
@Retention(RetentionPolicy.RUNTIME)
@Documented
@Component
public @interface Repository {
	@AliasFor(annotation = Component.class)
	String value() default "";
}
上面上个源码中均有 @Component 注解。
springboot广告位
示例代码
假如我们创建了一个 Spring Boot 项目,该项目的启动类位于 com.huangx.springboot.springboot_componentscan_demo1 包下面。但是,我们创建的 controller 位于 com.huangx.springboot.controller 包下面。因此,Spring Boot 默认是不会去扫描的,我们也是不能正常访问。为了解决这个问题,我们可以使用 @ComponentScan 注解指定扫描位置,如下:
(1)项目结构图如下
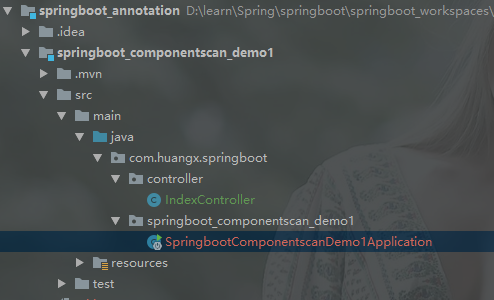
(2)IndexController 控制器的源代码如下:
package com.huangx.springboot.controller;

import org.springframework.stereotype.Component;
import org.springframework.stereotype.Controller;
import org.springframework.stereotype.Repository;
import org.springframework.stereotype.Service;
import org.springframework.web.bind.annotation.RequestMapping;
import org.springframework.web.bind.annotation.RestController;

@RestController
public class IndexController {

    @RequestMapping("/")
    public String index(){
        return "Welcome Spring Boot";
    }

}
(3)在Spring Boot 启动类添加 @ComponentScan 注释,源码如下:
package com.huangx.springboot.springboot_componentscan_demo1;

import org.springframework.boot.SpringApplication;
import org.springframework.boot.autoconfigure.SpringBootApplication;
import org.springframework.context.annotation.ComponentScan;

@ComponentScan(basePackages = {"com.huangx.springboot.controller"})
@SpringBootApplication
public class SpringbootComponentscanDemo1Application {
    public static void main(String[] args) {
        SpringApplication.run(SpringbootComponentscanDemo1Application.class, args);
    }
}
启动 Spring Boot 项目,访问 http://localhost:8080/ 地址。
当然,你也可以配置多个扫描路径。如下例:
@ComponentScan(basePackages = {
        "com.huangx.springboot.controller",
        "com.huangx.springboot.controller2"
})
@SpringBootApplication
public class SpringbootComponentscanDemo1Application {
    public static void main(String[] args) {
        SpringApplication.run(SpringbootComponentscanDemo1Application.class, args);
    }
}
上面实例,将分别扫描 com.huangx.springboot.controller 和 com.huangx.springboot.controller2 包下的类和子包下面的类。

 川公网安备51010802032098