前面介绍了 Containerfile 基础知识和常用指令,以及如何通过 podman build 根据 Containerfile 构建镜像,下面将通过实战示例,介绍如何使用 Containerfile 指令编写自己的 Containerfile。
下面是一个基于官方 Nginx 镜像构建自定义 Nginx 镜像的 Containerfile 示例,包含了基础配置、自定义网页、日志优化等功能,适合生产或测试环境使用。
目录结构
在正式编写 Containerfile 之前,我们先梳理一下我们容器的目录结构,便于后续编写 Containerfile,如下:
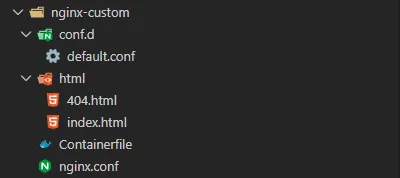
nginx-custom/
  ├── Containerfile          # 构建文件
  ├── nginx.conf             # Nginx 主配置
  ├── conf.d/
  │   └── default.conf       # 虚拟主机配置
  └── html/
      ├── index.html         # 首页
      └── 404.html           # 404 页面(可选)
准备工作目录
为了让 Containerfile 正常工作,需要在 Containerfile 所在的目录下准备以下文件 / 目录(可根据需求调整):
nginx.conf(主配置文件)
注意,为了演示,这里简化了配置(可根据官方默认配置修改):
user  nginx;
worker_processes  auto;  # 自动适应 CPU 核心数

error_log  /var/log/nginx/error.log warn;
pid        /var/run/nginx.pid;

events {
    worker_connections  1024;
}

http {
    include       /etc/nginx/mime.types;
    default_type  application/octet-stream;

    log_format  main  '$remote_addr - $remote_user [$time_local] "$request" '
                      '$status $body_bytes_sent "$http_referer" '
                      '"$http_user_agent" "$http_x_forwarded_for"';

    access_log  /var/log/nginx/access.log  main;

    sendfile        on;
    # tcp_nopush     on;

    keepalive_timeout  65;

    # gzip 压缩(可选,优化传输)
    gzip  on;
    gzip_types text/plain text/css application/json application/javascript text/xml application/xml application/xml+rss text/javascript;

    include /etc/nginx/conf.d/*.conf;  # 引入虚拟主机配置
}
conf.d 目录(虚拟主机配置)
创建 conf.d 目录,然后再该目录下面创建 default.conf 示例文件,定义一个简单的站点:
server {
    listen       80;
    server_name  localhost;  # 可替换为实际域名

    root   /usr/share/nginx/html;
    index  index.html index.htm;

    # 自定义错误页
    error_page  404              /404.html;
    location = /404.html {
        root   /usr/share/nginx/html;
    }

    # 禁止访问 .ht* 文件(安全优化)
    location ~ /\.ht {
        deny  all;
    }
}
html 目录(静态网页)
创建 html 目录,在目录下面创建 index.html 文件,如下:
<!DOCTYPE html>
<html>
<head>
    <meta charset="UTF-8">
    <meta name="viewport" content="width=device-width, initial-scale=1.0">
    <title>自定义 Nginx 页面</title>
    <style>
        body { background: #f0f0f0; text-align: center; padding: 50px; font-family: sans-serif; }
        h1 { color: #333; margin-bottom: 20px; }
        p { color: #666; font-size: 1.1rem; }
    </style>
</head>
<body>
    <h1>来自自定义 Nginx 镜像的问候!</h1>
    <p>使用 Podman 和 Containerfile 构建。</p>
</body>
</html>
创建 404.html 作为自定义 404 页面,如下:
<!DOCTYPE html>
<html>
<head>
    <meta charset="UTF-8">
    <meta name="viewport" content="width=device-width, initial-scale=1.0">
    <title>404 - 页面未找到</title>
    <style>
        * { margin:0; padding:0; box-sizing:border-box; font-family:sans-serif; }
        body { background:#f5f5f5; min-height:100vh; display:flex; flex-direction:column; align-items:center; justify-content:center; padding:20px; }
        .container { text-align:center; max-width:600px; width:100%; }
        .error-code { font-size:8rem; font-weight:700; color:#2c3e50; margin:0 0 20px; }
        .error-message { font-size:1.5rem; color:#34495e; margin:0 0 30px; }
        .error-desc { font-size:1rem; color:#7f8c8d; margin:0 0 40px; line-height:1.6; }
        .back-btn { padding:12px 30px; background:#3498db; color:white; border:none; border-radius:4px; font-size:1rem; cursor:pointer; }
        .back-btn:hover { background:#2980b9; }
    </style>
</head>
<body>
    <div>
        <div>404</div>
        <h1>页面未找到</h1>
        <p>你访问的页面不存在或已被删除,请检查URL后重试</p>
        <button onclick="window.history.back()">返回上一页</button>
    </div>
</body>
</html>
Podman广告
Containerfile 内容
下面是自定义 Nginx 镜像的 Containerfile 文件内容:
# 基础镜像:使用官方 Nginx 稳定版(Alpine 版本,体积更小)
FROM nginx:stable-alpine

# 维护者信息(可选)
LABEL maintainer="hxstrive@outlook.com"
LABEL description="Custom Nginx image with custom config and static files"

# 安装必要工具(如 curl 用于健康检查,可选)
RUN apk update && \
    apk add --no-cache curl && \
    rm -rf /var/cache/apk/*  # 清理缓存,减小镜像体积

# 复制自定义 Nginx 配置文件(覆盖默认配置)
# 假设当前目录有 nginx.conf(主配置)和 conf.d/ 目录(虚拟主机配置)
COPY nginx.conf /etc/nginx/nginx.conf
COPY conf.d/ /etc/nginx/conf.d/

# 复制自定义静态网页到 Nginx 默认站点目录
# 假设当前目录有 html/ 目录,包含 index.html 等文件
COPY html/ /usr/share/nginx/html/

# 调整文件权限(避免容器内权限问题,尤其是 rootless 模式下)
RUN chown -R nginx:nginx /usr/share/nginx/html /var/log/nginx && \
    chmod -R 755 /usr/share/nginx/html

# 配置 Nginx 日志输出到标准输出(便于容器日志收集,如 podman logs)
RUN ln -sf /dev/stdout /var/log/nginx/access.log && \
    ln -sf /dev/stderr /var/log/nginx/error.log

# 暴露 Nginx 默认端口(80 或 443,根据配置文件调整)
EXPOSE 80
# EXPOSE 443  # 若启用 HTTPS,取消注释

# 启动命令(使用官方默认,无需修改,Nginx 以非 daemon 模式运行)
CMD ["nginx", "-g", "daemon off;"]
构建与运行命令
构建镜像
进入到 my-nginx 工作目录,即 Containerfile 文件所在的目录,然后执行 podman build 命令构建镜像,如下:
podman build -t my-nginx:latest .
构建详细日志如下:
C:\Users\hxstri\nginx-custom> podman build -t my-nginx:latest .
STEP 1/11: FROM nginx:stable-alpine
STEP 2/11: LABEL maintainer="hxstrive@outlook.com"
--> Using cache 4c83958c03d32734b8afdbcf964d888773fe64fa21fc9449f9b36141d399602e
--> 4c83958c03d3
STEP 3/11: LABEL description="Custom Nginx image with custom config and static files"
--> Using cache 98c0aff0990c6dc4d231fdbe9bb1234674156cc7e9144b01da07aa0977af57c0
--> 98c0aff0990c
STEP 4/11: RUN apk update &&     apk add --no-cache curl &&     rm -rf /var/cache/apk/*  # 清理缓存,减小镜像体积
fetch https://dl-cdn.alpinelinux.org/alpine/v3.21/main/x86_64/APKINDEX.tar.gz
fetch https://dl-cdn.alpinelinux.org/alpine/v3.21/community/x86_64/APKINDEX.tar.gz
v3.21.5-73-g04f4a84fdf1 [https://dl-cdn.alpinelinux.org/alpine/v3.21/main]
v3.21.5-74-g3749f9c5659 [https://dl-cdn.alpinelinux.org/alpine/v3.21/community]
OK: 25403 distinct packages available
fetch https://dl-cdn.alpinelinux.org/alpine/v3.21/main/x86_64/APKINDEX.tar.gz
fetch https://dl-cdn.alpinelinux.org/alpine/v3.21/community/x86_64/APKINDEX.tar.gz
OK: 45 MiB in 68 packages
--> 89a5bbd7cd26
STEP 5/11: COPY nginx.conf /etc/nginx/nginx.conf
--> 2d62c7b28d1d
STEP 6/11: COPY conf.d/ /etc/nginx/conf.d/
--> 09137f99b5df
STEP 7/11: COPY html/ /usr/share/nginx/html/
--> d0a43437f037
STEP 8/11: RUN chown -R nginx:nginx /usr/share/nginx/html /var/log/nginx &&     chmod -R 755 /usr/share/nginx/html
--> 8219e8b55d34
STEP 9/11: RUN ln -sf /dev/stdout /var/log/nginx/access.log &&     ln -sf /dev/stderr /var/log/nginx/error.log
--> 463ef3905770
STEP 10/11: EXPOSE 80
--> 475f23518f27
STEP 11/11: CMD ["nginx", "-g", "daemon off;"]
COMMIT my-nginx:latest
--> af59fa447cb6
Successfully tagged localhost/my-nginx:latest
af59fa447cb6ca82defa54190c94de8731bcf0a9b1bbe64afeb636435d9b4f5f
使用 podman images 命令查看成功构建的镜像:
C:\Users\hxstri\nginx-custom> podman images | findstr my-nginx
localhost/my-nginx                     latest         af59fa447cb6  About an hour ago  49.9 MB
运行容器
如果镜像成功构建,则使用 podman run 命令创建一个名为 my-nginx-container 的容器,如下:
# 映射 8080 端口到容器 80 端口,后台运行
podman run -d -p 8080:80 --name my-nginx-container my-nginx:latest
执行日志如下:
C:\Users\hxstri\nginx-custom> podman run -d -p 8080:80 --name my-nginx-container my-nginx:latest
d4eea1af2572fbdcdbcd95ebd52d8c8cea79450a33d9ddd5d9ed47b724ee0c53

C:\Users\hxstri\nginx-custom> podman ps
CONTAINER ID  IMAGE                      COMMAND               CREATED         STATUS         PORTS                 NAMES
d4eea1af2572  localhost/my-nginx:latest  nginx -g daemon o...  22 seconds ago  Up 22 seconds  0.0.0.0:8080->80/tcp  my-nginx-container
验证
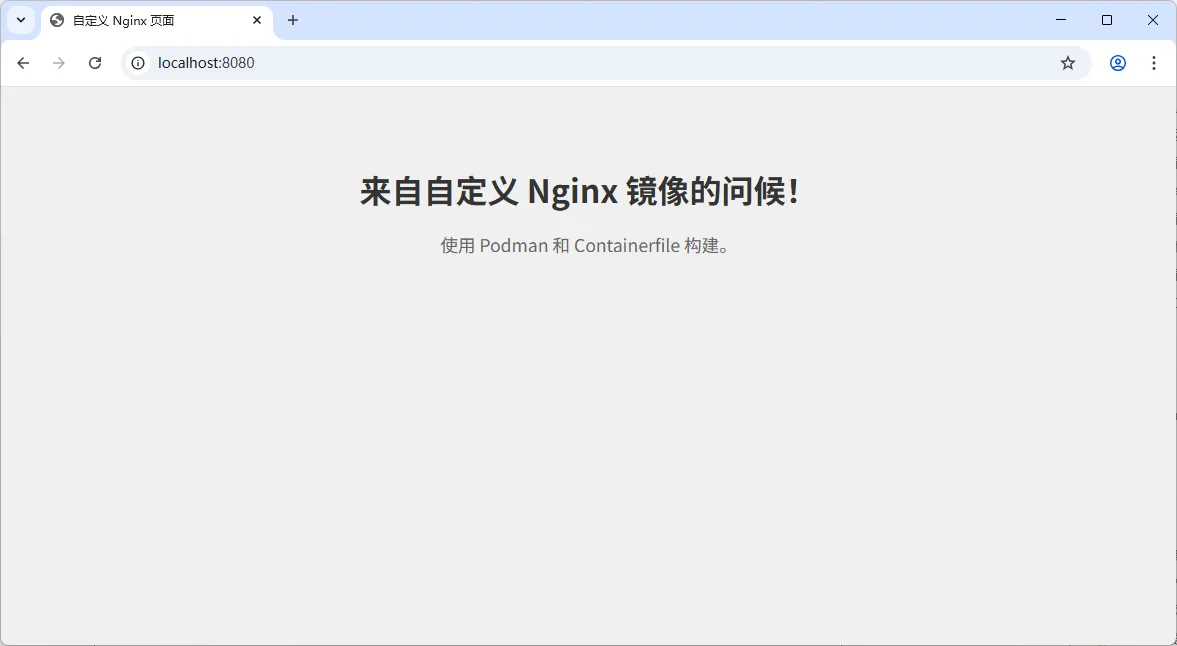
上面一切正常,就可以通过浏览器访问 http://localhost:8080 地址查看到自定义的首页,如下图:
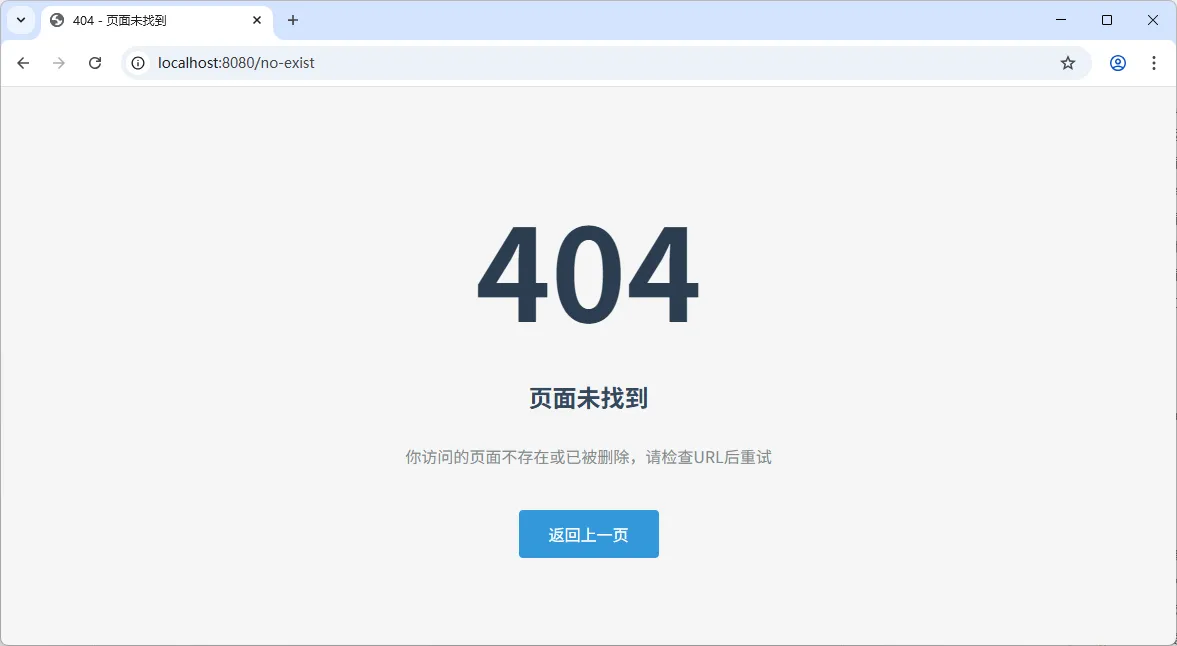
访问一个不存在的地址,查看 404 页面,如下图:
或通过 podman logs my-nginx-container 查看日志:
C:\Users\hxstri\nginx-custom> podman logs my-nginx-container
/docker-entrypoint.sh: /docker-entrypoint.d/ is not empty, will attempt to perform configuration
/docker-entrypoint.sh: Looking for shell scripts in /docker-entrypoint.d/
/docker-entrypoint.sh: Launching /docker-entrypoint.d/10-listen-on-ipv6-by-default.sh
10-listen-on-ipv6-by-default.sh: info: Getting the checksum of /etc/nginx/conf.d/default.conf
10-listen-on-ipv6-by-default.sh: info: /etc/nginx/conf.d/default.conf differs from the packaged version
/docker-entrypoint.sh: Sourcing /docker-entrypoint.d/15-local-resolvers.envsh
/docker-entrypoint.sh: Launching /docker-entrypoint.d/20-envsubst-on-templates.sh
/docker-entrypoint.sh: Launching /docker-entrypoint.d/30-tune-worker-processes.sh
/docker-entrypoint.sh: Configuration complete; ready for start up
172.24.87.179 - - [18/Nov/2025:05:16:06 +0000] "GET / HTTP/1.1" 200 417 "-" "Mozilla/5.0 (Windows NT 10.0; Win64; x64) AppleWebKit/537.36 (KHTML, like Gecko) Chrome/141.0.0.0 Safari/537.36" "-"
2025/11/18 05:16:07 [error] 24#24: *1 open() "/usr/share/nginx/html/favicon.ico" failed (2: No such file or directory), client: 172.24.87.179, server: localhost, request: "GET /favicon.ico HTTP/1.1", host: "localhost:8080", referrer: "http://localhost:8080/"
172.24.87.179 - - [18/Nov/2025:05:16:07 +0000] "GET /favicon.ico HTTP/1.1" 404 776 "http://localhost:8080/" "Mozilla/5.0 (Windows NT 10.0; Win64; x64) AppleWebKit/537.36 (KHTML, like Gecko) Chrome/141.0.0.0 Safari/537.36" "-"
2025/11/18 05:16:40 [error] 24#24: *1 open() "/usr/share/nginx/html/no-exist" failed (2: No such file or directory), client: 172.24.87.179, server: localhost, request: "GET /no-exist HTTP/1.1", host: "localhost:8080"
172.24.87.179 - - [18/Nov/2025:05:16:40 +0000] "GET /no-exist HTTP/1.1" 404 776 "-" "Mozilla/5.0 (Windows NT 10.0; Win64; x64) AppleWebKit/537.36 (KHTML, like Gecko) Chrome/141.0.0.0 Safari/537.36" "-"
到这里,自定义 Nginx 镜像的过程就结束了,你可以根据自己需要进行调整。

 川公网安备51010802032098