在采用 Spring Boot 构建的非前后端分离项目里,Spring Security 能够借助多种视图技术对页面的显示效果实施控制,例如 JSP 和 Thymeleaf。由于 Thymeleaf 具备与 Spring 框架深度整合的特性,还拥有自然模板的优势,在这类项目中,它常被选作视图展示技术。
Thymeleaf 针对 Spring Security 的支持功能,都被封装在 thymeleaf-extras-springsecurityX 模块当中。就当前的情况而言,该模块的最新版本 thymeleaf-extras-springsecurity6 与 Spring Security 6 相对应。所以,若想在项目里运用 Thymeleaf 来实现安全控制的视图功能,需要在项目中添加以下依赖:
<dependency>
  <groupId>org.thymeleaf.extras</groupId>
  <artifactId>thymeleaf-extras-springsecurity6</artifactId>
</dependency>
<dependency>
  <groupId>org.springframework.boot</groupId>
  <artifactId>spring-boot-starter-thymeleaf</artifactId>
</dependency>
除了添加依赖,还需要在 html 页面中引入 thymeleaf 命名空间和 security 命名空间,如下:
<!DOCTYPE html>
<html xmlns:th="http://www.thymeleaf.org"
      xmlns:sec="http://www.thymeleaf.org/extras/spring-security">
<head>
    <meta charset="UTF-8">
</head>
<body>

</body>
</html>
获取属性
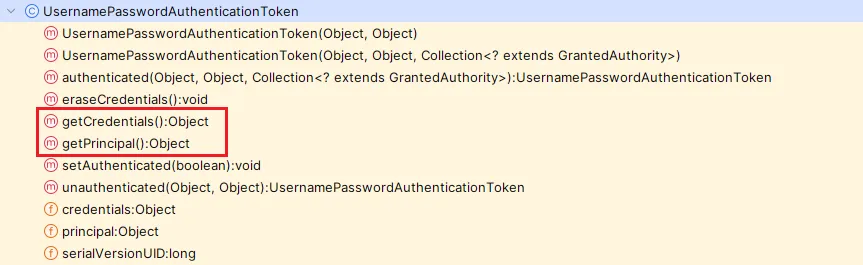
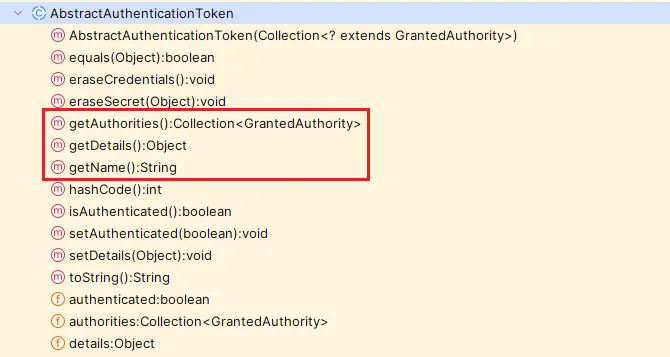
可以在 html 页面中通过 sec:authentication="" 属性获取 UsernamePasswordAuthenticationToken 中所有 getXXX() 的内容,包含父类中的 getXXX() 的内容。
根据源码得出下面属性:
spring 广告位
实现步骤
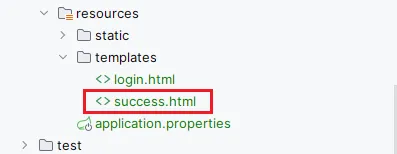
新建 success.html
在项目 resources 中新建 templates 文件夹,在 templates 中新建 success.html 页面,如下图:
编写 success.html
在 success.html 中编写下面内容,测试获取到的值,如下:
<!DOCTYPE html>
<html xmlns:th="http://www.thymeleaf.org"
      xmlns:sec="http://www.thymeleaf.org/extras/spring-security">
<head>
    <meta charset="UTF-8">
    <title>登录成功</title>
    <script src="/jquery-1.9.0.js"></script>
</head>
<body>
    <p>登录成功,欢迎光临!</p>
    <div>
        <p>登录账号:<span sec:authentication="name">-</span></p>
        <p>登录账号:<span sec:authentication="principal.username">-</span></p>
        <p>凭证:<span sec:authentication="credentials">-</span></p>
        <p>权限和角色:<span sec:authentication="authorities">-</span></p>
        <p>details:<span sec:authentication="details">-</span></p>
        <p>客户端地址:<span sec:authentication="details.remoteAddress">-</span></p>
        <p>sessionId:<span sec:authentication="details.sessionId">-</span></p>
    </div>
</body>
</html>
编写控制器
thymeleaf 页面需要控制转发,在控制器类中编写下面方法
@RequestMapping("/view/success")
public String success() {
    return "success";
}
修改配置
在 SecurityConfig 配置类中,配置登录成功后默认跳转到 /view/success 地址,如下:
@Bean
public SecurityFilterChain securityFilterChain(HttpSecurity http) throws Exception {
    System.out.println("securityFilterChain()");
    // csrfCustomizer.ignoringRequestMatchers(*) 表示所有请求地址都不使用 csrf
    http.csrf(csrfCustomizer -> csrfCustomizer.ignoringRequestMatchers("*"))
            // ...

            // formLogin 用于配置表单登录功能。
            // permitAll() 表示允许所有用户访问表单登录相关的页面,例如登录页面、登录处理接口等。
            .formLogin(formLoginCustomizer -> formLoginCustomizer.loginPage("/view/login") // 设置登录页面为 /view/login
                    .loginProcessingUrl("/login") // 设置登录处理接口为 /login
                    .failureHandler((request, response, exception) -> {
                        System.out.println("failureHandler()");
                        response.sendRedirect("/view/login?error");
                    })
                    // 设置登录成功自动跳转到 /success 页面,true 表示自动重定向到该页面
                    .successHandler((request, response, authentication) -> {
                        System.out.println("successHandler()");
                        response.sendRedirect("/view/success");
                    }).permitAll()
            )
            // ...
            // 用于启用 HTTP 基本认证,withDefaults() 表示使用默认的 HTTP 基本认证配置。
            .httpBasic(withDefaults());

    return http.build();
}
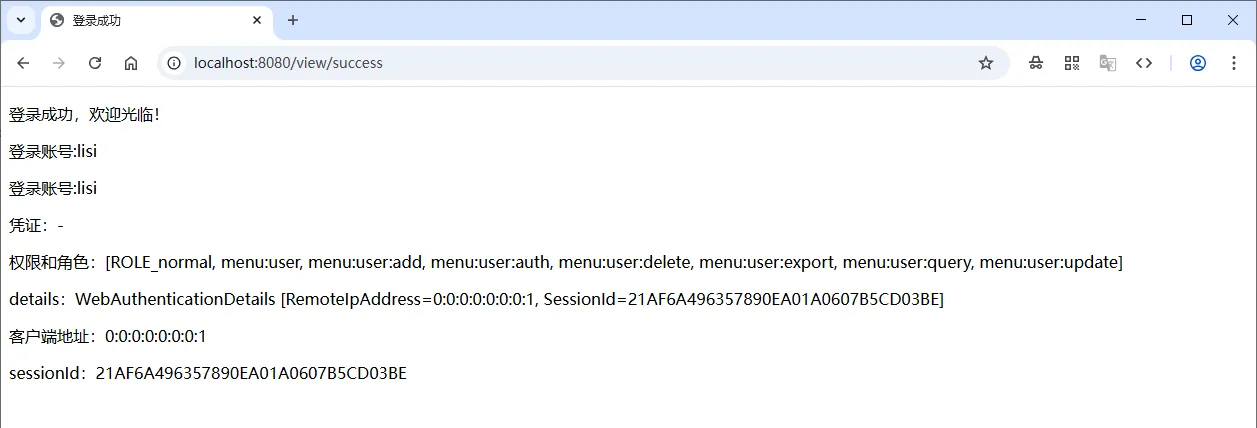
运行和验证
重启项目,成功登录,跳转到登录成功页面,效果如下图:
spring 广告位
权限判断
在 html 页面中可以使用 sec:authorize="表达式" 的方式进行权限控制,判断是否显示某些内容。“表达式”的内容和 access(表达式) 的用法相同。如果表达式成立(即用户具有指定的权限),则显示对应的内容。如果表达式不成立(即没有权限),则不显示对应的元素。
示例:不同权限的用户显示不同的按钮
设置用户角色和权限
示例项目基于前面章节提供的数据库角色和权限信息进行验证,用户的权限信息保存在数据库中,这里不再赘述。
控制页面显示效果
在页面中根据用户权限和角色判断页面中显示的内容,如下:
通过权限判断:
<button sec:authorize="hasAuthority('/insert')">新增</button>
<button sec:authorize="hasAuthority('/delete')">删除</button>
<button sec:authorize="hasAuthority('/update')">修改</button>
<button sec:authorize="hasAuthority('/select')">查看</button>
<br/>
通过角色判断:
<button sec:authorize="hasRole('abc')">新增</button>
<button sec:authorize="hasRole('abc')">删除</button>
<button sec:authorize="hasRole('abc')">修改</button>
<button sec:authorize="hasRole('abc')">查看</button>
运行和验证
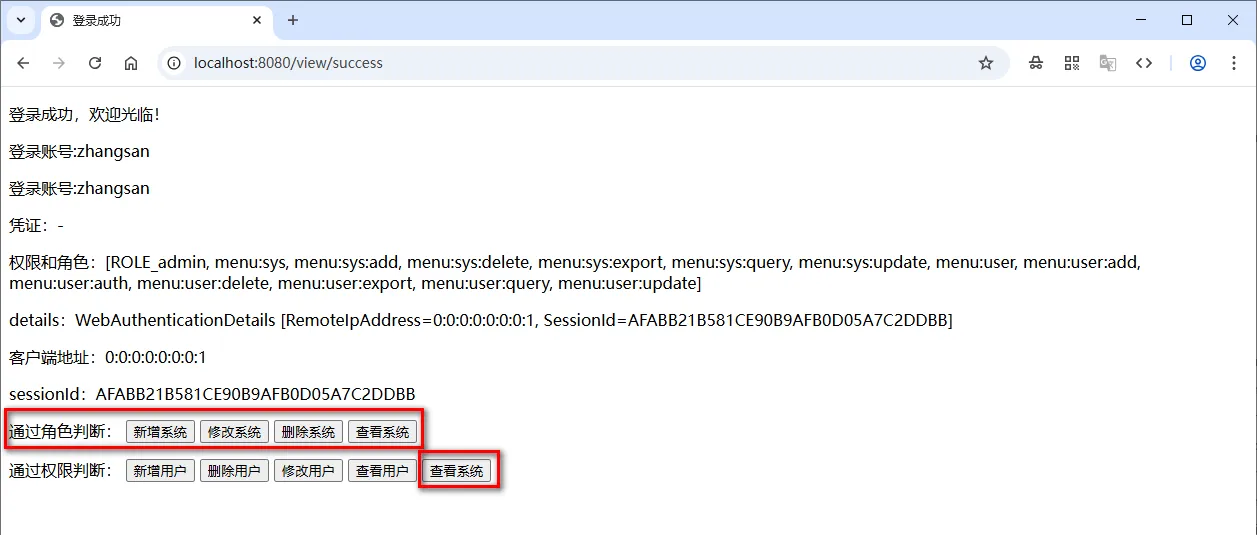
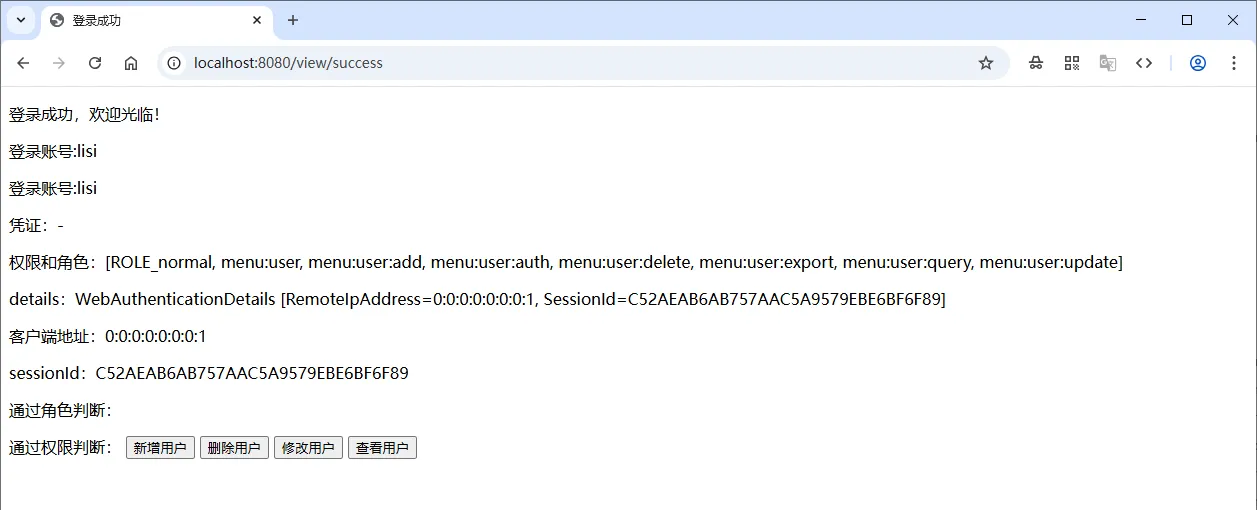
重启项目,分别使用“zhangsan”和“lisi”账号登录,观察登录成功页面的变化,如下:
(1)使用 zhangsan 账号登录,效果如下图:
(2)使用 lisi 账号登录,效果如下图:

 川公网安备51010802032098