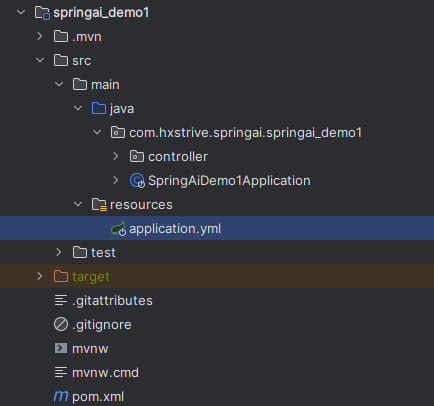
本文将通过两个简单示例,快速了解如何通过 Spring AI 构建一个简单的 AI 聊天 Chat 程序。项目结构如下图:
项目依赖(pom.xml)
本示例将使用 openai 来作为演示,因此需要引入 openai 依赖,如下:
<!-- 引入 openai 依赖 -->
<dependency>
    <groupId>org.springframework.ai</groupId>
    <artifactId>spring-ai-starter-model-openai</artifactId>
</dependency>
项目的完整依赖信息如下:
<?xml version="1.0" encoding="UTF-8"?>
<project xmlns="http://maven.apache.org/POM/4.0.0" xmlns:xsi="http://www.w3.org/2001/XMLSchema-instance"
    xsi:schemaLocation="http://maven.apache.org/POM/4.0.0 https://maven.apache.org/xsd/maven-4.0.0.xsd">
    <modelVersion>4.0.0</modelVersion>
    <parent>
       <groupId>org.springframework.boot</groupId>
       <artifactId>spring-boot-starter-parent</artifactId>
       <version>3.5.0</version>
       <relativePath/> <!-- lookup parent from repository -->
    </parent>
    <groupId>com.hxstrive.springai</groupId>
    <artifactId>springai_demo1</artifactId>
    <version>0.0.1-SNAPSHOT</version>
    <name>springai_demo1</name>
    <description>springai_demo1</description>

    <properties>
       <java.version>17</java.version>
       <spring-ai.version>1.0.0</spring-ai.version>
    </properties>

    <dependencies>
       <!-- 引入 openai 依赖 -->
       <dependency>
          <groupId>org.springframework.ai</groupId>
          <artifactId>spring-ai-starter-model-openai</artifactId>
       </dependency>

       <!-- spring boot web 依赖 -->
       <dependency>
          <groupId>org.springframework.boot</groupId>
          <artifactId>spring-boot-starter-web</artifactId>
       </dependency>

       <!-- spring boot 辅助开发依赖 -->
       <dependency>
          <groupId>org.springframework.boot</groupId>
          <artifactId>spring-boot-devtools</artifactId>
          <scope>runtime</scope>
          <optional>true</optional>
       </dependency>
       <dependency>
          <groupId>org.projectlombok</groupId>
          <artifactId>lombok</artifactId>
          <optional>true</optional>
       </dependency>
       <dependency>
          <groupId>org.springframework.boot</groupId>
          <artifactId>spring-boot-starter-test</artifactId>
          <scope>test</scope>
       </dependency>
    </dependencies>

    <dependencyManagement>
       <dependencies>
          <dependency>
             <groupId>org.springframework.ai</groupId>
             <artifactId>spring-ai-bom</artifactId>
             <version>${spring-ai.version}</version>
             <type>pom</type>
             <scope>import</scope>
          </dependency>
       </dependencies>
    </dependencyManagement>

    <build>
       <plugins>
          <plugin>
             <groupId>org.apache.maven.plugins</groupId>
             <artifactId>maven-compiler-plugin</artifactId>
             <configuration>
                <annotationProcessorPaths>
                   <path>
                      <groupId>org.projectlombok</groupId>
                      <artifactId>lombok</artifactId>
                   </path>
                </annotationProcessorPaths>
             </configuration>
          </plugin>
          <plugin>
             <groupId>org.springframework.boot</groupId>
             <artifactId>spring-boot-maven-plugin</artifactId>
             <configuration>
                <excludes>
                   <exclude>
                      <groupId>org.projectlombok</groupId>
                      <artifactId>lombok</artifactId>
                   </exclude>
                </excludes>
             </configuration>
          </plugin>
       </plugins>
    </build>

</project>
项目启动类
下面是项目的启动类:
package com.hxstrive.springai.springai_demo1;

import org.springframework.boot.SpringApplication;
import org.springframework.boot.autoconfigure.SpringBootApplication;
import org.springframework.web.bind.annotation.RestController;

/**
 * 启动类
 * @author hxstrive.com
 */
@RestController
@SpringBootApplication
public class SpringAiDemo1Application {

    public static void main(String[] args) {
       SpringApplication.run(SpringAiDemo1Application.class, args);
    }

}
上面启动类和普通的 Spring Boot 启动类一样,没有什么特别的。
AI广告位
项目配置信息
在 resources 目录下面创建 application.yml 配置类:
spring:
  application:
    name: springai_demo1
  # AI配置
  ai:
    # openai相关配置
    openai:
      # 基础地址
      base-url: https://api.xty.app
      # AI KEY
      # 免费key,仅能调用3.5模型
      api-key: sk-TmZpI4DifxqHTNb6AXPS6rmsSW**************************
      # 聊天模型配置
      chat:
        options:
          model: gpt-3.5-turbo
注意,您需要配置你自己的 api-key,基础地址使用 AiCore API 提供地址,让它帮我们去访问 OpenAI 服务。
Chat 聊天(非流式)
创建一个简单的 Controller,实现非流式聊天,代码如下:
package com.hxstrive.springai.springai_demo1.controller;

import jakarta.annotation.Resource;
import org.springframework.ai.chat.client.ChatClient;
import org.springframework.web.bind.annotation.GetMapping;
import org.springframework.web.bind.annotation.RequestMapping;
import org.springframework.web.bind.annotation.RequestParam;
import org.springframework.web.bind.annotation.RestController;
import reactor.core.publisher.Flux;

/**
 * OpenAi 聊天机器人
 * @author hxstrive.com
 */
@RestController
@RequestMapping("/ai/openai")
public class OpenAiChatController {

    // 注入ChatClient.Builder,用于创建ChatClient实例
    @Resource
    private ChatClient.Builder builder;

    // 简单用法:
    // http://localhost:8080/ai/openai/chat?message=用中文介绍自己
    @GetMapping("/chat")
    public String chat(@RequestParam("message") String message) {
        ChatClient chatClient = builder.build();
        String response = chatClient.prompt(message).call().content();
        System.out.println(response);
        return response;
    }

}
上述代码。该控制器提供了一个 HTTP 接口,允许客户端通过 GET 请求向 OpenAI 的聊天模型发送消息,并获取 AI 生成的回复。
代码的核心逻辑如下:
运行项目,使用浏览器访问 http://localhost:8080/ai/openai/chat?message=你好,你是谁? 地址,效果如下图:
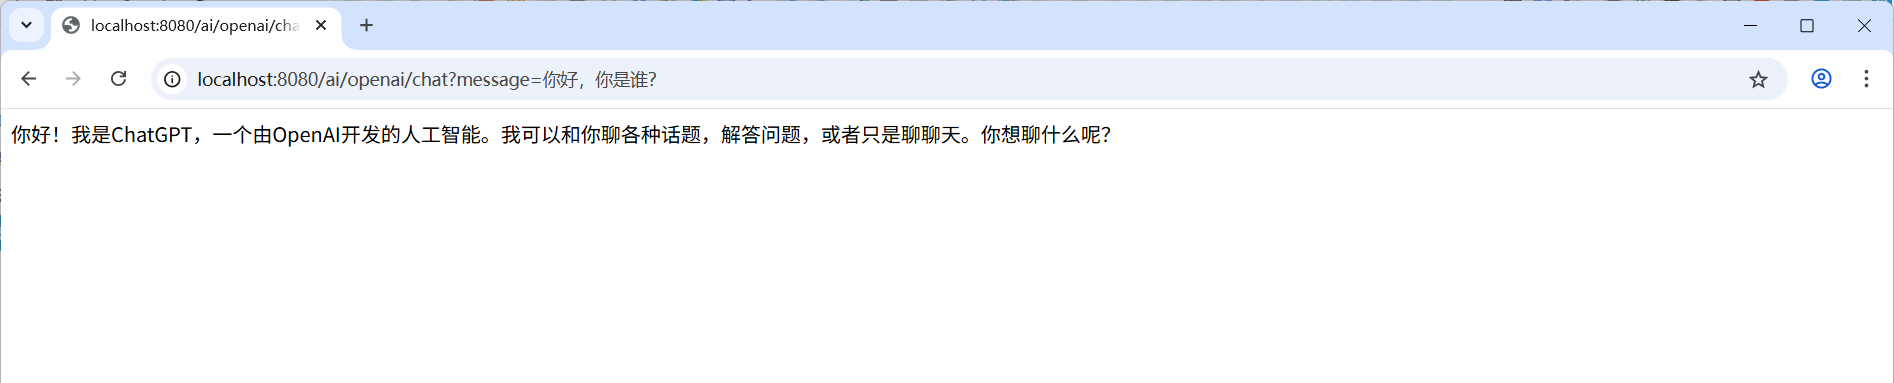
上图中,返回了 AI 的结果。
Chat 聊天(流式)
基于上面创建的 OpenAiChatController 控制器,添加一个新的方法,用于实现流式聊天,如下:
// 流式用法:
// http://localhost:8080/ai/openai/chat-stream?message=用中文介绍自己
@GetMapping("/chat-stream")
public Flux<String> chatStream(@RequestParam("message") String message) {
    return builder.build().prompt(message).stream().content();
}
上述接口提供流式聊天功能,允许客户端以实时数据流的形式接收 AI 生成的内容,而非等待完整响应后一次性返回。常用于长文本生成或需要即时反馈的场景(如聊天机器人、代码生成)。
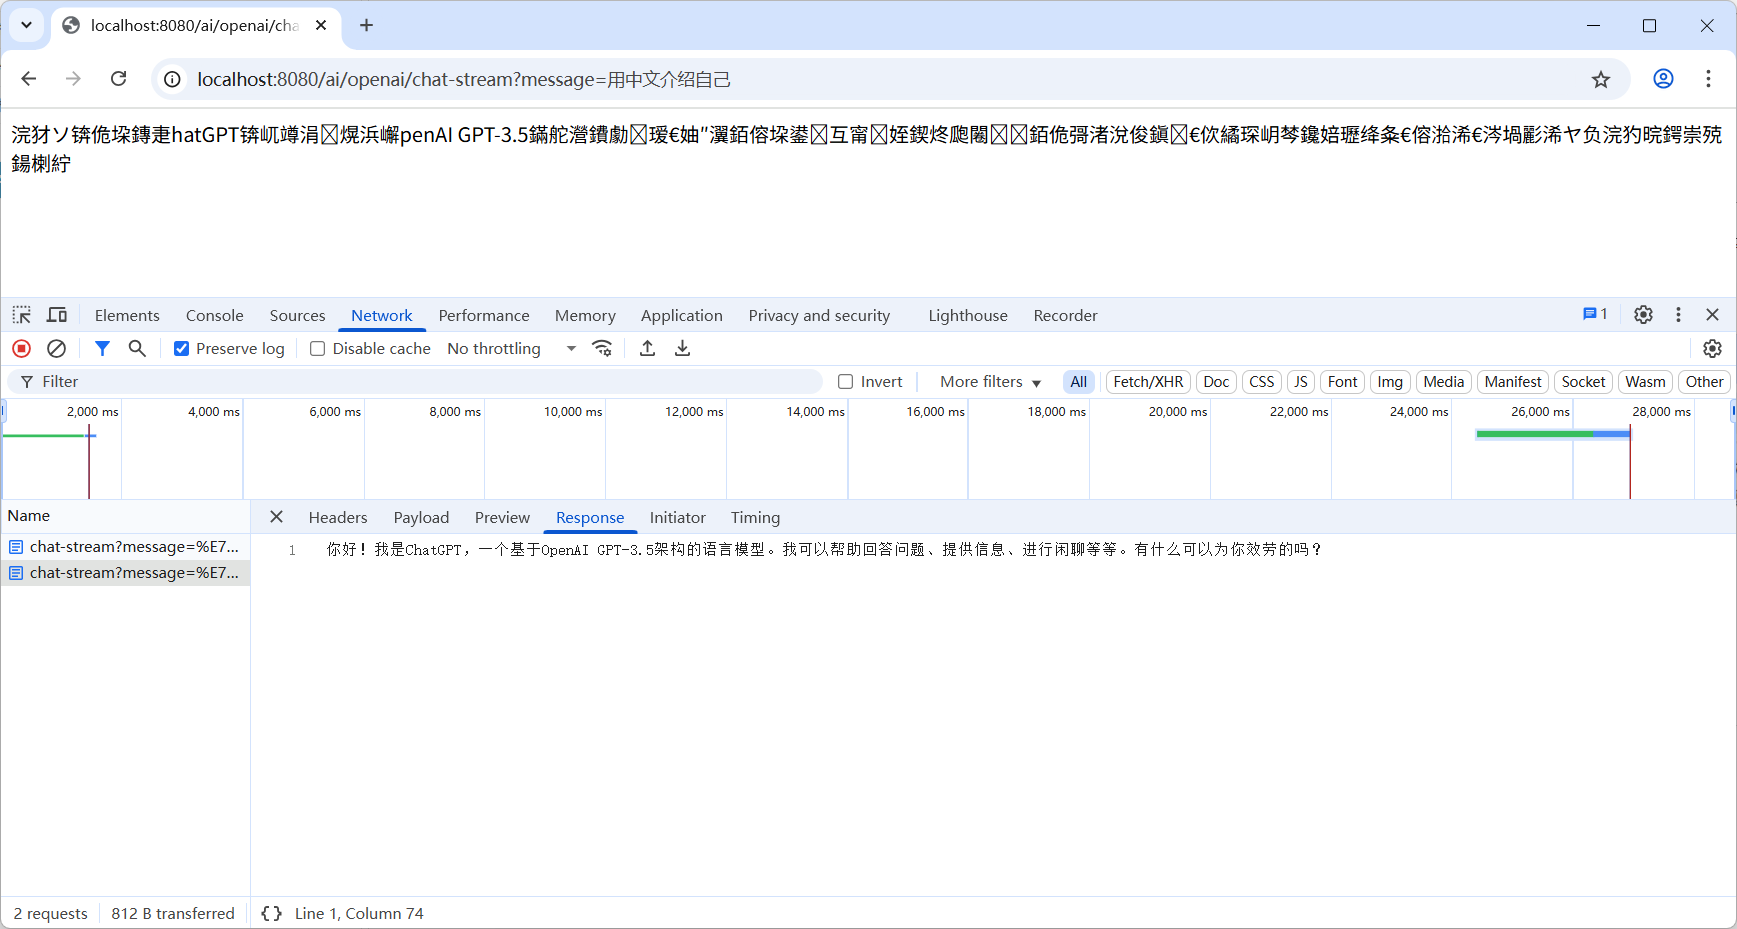
运行项目,使用浏览器访问 http://localhost:8080/ai/openai/chat-stream?message=用中文介绍自己 地址,效果如下图:
上图出现乱码,是因为前端没有使用正确的编码解析返回的数据。实际接口返回的数据并非乱码,如下图:
通过上述示例,我们已经知道如何使用 Spring AI 开发一个简单的 AI 聊天机器人。后续章节将介绍更多关于 Spring AI 的使用……

 川公网安备51010802032098