上文在我们开发 <article-item> 组件时,它的一些功能可能要求我们和父级组件进行沟通。例如,我们可能会引入一个辅助功能来设置页面背景颜色。
在其父组件中,我们可以通过添加一个 pageBgColor 数据属性来支持这个功能,例如:
new Vue({
   el: '#app',
   data: {
       articles: [/* ... */],
       pageBgColor: "#FFFFFF"
   }
})
pageBgColor 可以在模板中用来控制页面的背景颜色,例如:
<div id="app" v-bind:style="{backgroundColor: pageBgColor}">
   <article-item v-for="article in articles"
       v-bind:key="article.id"
       v-bind:article="article"></article-item>
</div>
现在我们在文章列表项中添加三个按钮来设置页面背景为红色、绿色、蓝色,例如:
Vue.component('article-item', {
   // 自定义 prop
   props: [ "article" ],
   template: `
       <div style="background:#F0F0F0;margin-bottom:10px;padding:10px;">
           <div>{{article.title}}</div>
           <div style="font-size:14px;color:#555;">
               <label>发布日期:{{article.date}}</label>
               <label>浏览量:{{article.count}}</label>
           </div>
           <div>
               <button type="button">红色</button>
               <button type="button">绿色</button>
               <button type="button">蓝色</button>
           </div>
       </div>
   `
});
问题是上面定义的三个按钮不会做任何事,例如:
<button type="button">红色</button>
<button type="button">绿色</button>
<button type="button">蓝色</button>
当点击这个按钮时,我们需要告诉父级组件页面背景是什么颜色。幸好 Vue 实例提供了一个自定义事件的系统来解决这个问题。父级组件可以像处理本地 DOM 事件一样通过 v-on 监听子组件实例的任意事件,例如:
<div id="app" v-bind:style="{backgroundColor: pageBgColor}">
   <!-- v-on:set-bg-color-red、v-on:set-bg-color-green、v-on:set-bg-color-blue 为自定义事件,
       子组件可以通过 $emit 去触发这些事件 -->
   <article-item v-for="article in articles"
       v-bind:key="article.id"
       v-bind:article="article"
       v-on:set-bg-color-red="pageBgColor='red'"
       v-on:set-bg-color-green="pageBgColor='green'"
       v-on:set-bg-color-blue="pageBgColor='blue'"></article-item>
</div>
子组件可以通过调用内建的 $emit 方法并传入事件名称来触发一个事件,例如:
<!-- 触发 set-bg-color-red 自定义事件 -->
<button type="button" v-on:click="$emit('set-bg-color-red')">红色</button>
<button type="button" v-on:click="$emit('set-bg-color-green')">绿色</button>
<button type="button" v-on:click="$emit('set-bg-color-blue')">蓝色</button>
因为在父组件中使用 v-on 监听了自定义的 v-on:set-bg-color-red、v-on:set-bg-color-green、v-on:set-bg-color-blu 事件,当我们在子组件中通过 $emit 触发自定义事件时,它可以接收该事件和值。
完整代码:
示例:
<html>
<head>
   <meta charset="UTF-8">
   <meta http-equiv="X-UA-Compatible" content="IE=edge">
   <meta name="viewport" content="width=device-width, initial-scale=1.0">
   <title>Vue</title>
   <script src="https://www.hxstrive.com/cdn/libs/vue/2.7.16/vue.min.js"></script>
</head>
<body>

   <div id="app" v-bind:style="{backgroundColor: pageBgColor}">
       <!-- v-on:set-bg-color-red、v-on:set-bg-color-green、v-on:set-bg-color-blue 为自定义事件,
           子组件可以通过 $emit 去触发这些事件 -->
       <article-item v-for="article in articles"
           v-bind:key="article.id"
           v-bind:article="article"
           v-on:set-bg-color-red="pageBgColor='red'"
           v-on:set-bg-color-green="pageBgColor='green'"
           v-on:set-bg-color-blue="pageBgColor='blue'"></article-item>
   </div>

   <script type="text/javascript">
       // 定义文章相组件
       Vue.component('article-item', {
           // 自定义 prop
           props: [ "article" ],
           template: `
               <div style="background:#F0F0F0;margin-bottom:10px;padding:10px;">
                   <div>{{article.title}}</div>
                   <div style="font-size:14px;color:#555;">
                       <label>发布日期:{{article.date}}</label>
                       <label>浏览量:{{article.count}}</label>
                   </div>
                   <div>
                       <button type="button" v-on:click="$emit('set-bg-color-red')">红色</button>
                       <button type="button" v-on:click="$emit('set-bg-color-green')">绿色</button>
                       <button type="button" v-on:click="$emit('set-bg-color-blue')">蓝色</button>
                   </div>
               </div>
           `
       });

       var app = new Vue({
           el: "#app",
           data: {
               articles: [
                   { id:1, title:"Vue 入门", date:"昨日", count:189 },
                   { id:2, title:"Vue 生命周期", date:"上周", count:320 },
                   { id:3, title:"Vue 内部实现原理", date:"2023年6月9日", count:102 }
               ],
               pageBgColor: "#FFFFFF"
           }
       });
   </script>

</body>
</html>
👉自己动手试一试 »
效果如下图:
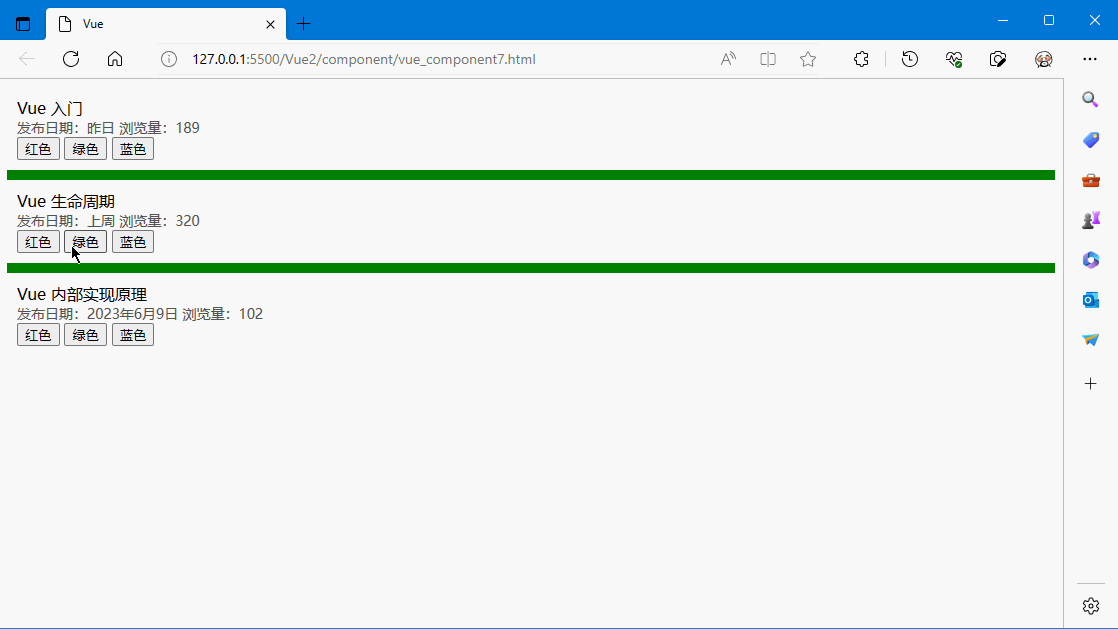
vue广告位
使用事件抛出一个值
有的时候用一个事件来抛出一个特定的值是非常有用的。例如我们可能想让 <article-item> 组件决定页面显示什么背景颜色。这时可以使用 $emit 的第二个参数来提供这个值,例如:
<button type="button" v-on:click="$emit('set-bg-color','red')">红色</button>
<button type="button" v-on:click="$emit('set-bg-color','green')">绿色</button>
<button type="button" v-on:click="$emit('set-bg-color','blue')">蓝色</button>
然后当在父级组件监听这个事件的时候,我们可以通过 $event 访问到被抛出的这个值:
<div id="app" v-bind:style="{backgroundColor: pageBgColor}">
   <!-- 注意:$event 就是 $emit 传递过来的值 -->
   <article-item v-for="article in articles"
       v-bind:key="article.id"
       v-bind:article="article"
       v-on:set-bg-color="pageBgColor=$event"></article-item>
</div>
或者,如果这个事件处理函数是一个方法:
<div id="app" v-bind:style="{backgroundColor: pageBgColor}">
   <!-- 注意:$event 就是 $emit 传递过来的值 -->
   <article-item v-for="article in articles"
       v-bind:key="article.id"
       v-bind:article="article"
       v-on:set-bg-color="setBgColor"></article-item>
</div>
那么这个值将会作为第一个参数传入这个方法:
methods: {
   setBgColor: function(color) {
       this.pageBgColor = color;
   }
}
在组件上使用 v-model
自定义事件也可以用于创建支持 v-model 的自定义输入组件。记住:
<input v-model="searchText">
等价于:
<input
   v-bind:value="searchText"
   v-on:input="searchText = $event.target.value">
当用在组件上时,v-model 则会这样:
<custom-input
   v-bind:value="searchText"
   v-on:input="searchText = $event"></custom-input>
为了让它正常工作,这个组件内的 <input> 必须:
(1)将其 value 属性绑定到一个名叫 value 的 prop 上
(2)在其 input 事件被触发时,将新的值通过自定义的 input 事件抛出
写成代码之后是这样的:
Vue.component('custom-input', {
   props: ['value'],
   template: `
       <input
           v-bind:value="value"
           v-on:input="$emit('input', $event.target.value)">
   `
})
现在 v-model 就应该可以在这个组件上完美地工作起来了:
<custom-input v-model="searchText"></custom-input>

 川公网安备51010802032098